Controls - How to enter and display Office/Microsoft 365 email addresses with a combo box
Within organisations, a typical requirement is to simplify the entry of email addresses by providing a combo box that displays all email addresses in the the Microsoft/Office 365 tenant
The usual requirement is to sllow users to search for the required email address by typing into the combo box control.
This post examines how to carry out this task, including the formula that sets the email address in the combo box when a user loads an existing record.
The data structure for our sample app
To demonstrate, let's take the example of an table that stores responses to customer issue.
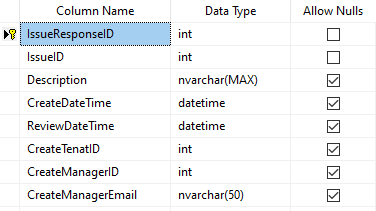
This table contains a column that stores the email address of the manager that is associated with the record.
For this demonstration, we'll begin by building an auto generated app that's based on this table. As a prerequisite, we must also add the 'Office365Users' data source.
Setting the items of a Combo box to display Office 365 email addresses
On the edit form, we delete the text input control that appears by default in the 'CreateManagerEmail' card, and insert a combo box control. It will be necessary to resolve any errors that appear due to references to the text input control that we deleted.
To configure the combo box so that it shows matching email addresses as
the user types into the control, we set the items property of the combo
box to the following formula.
Office365Users.SearchUserV2({searchTerm:cboUsers.SearchText}).value
This formula calls the SearchUsersV2 method and passes a searchTerm that
corresponds to the search text that the user enters into the combo box.
To configure the combo box so that it displays the email address but enables users to search by the email display name, we can configure the fields of the combo box as necessary.
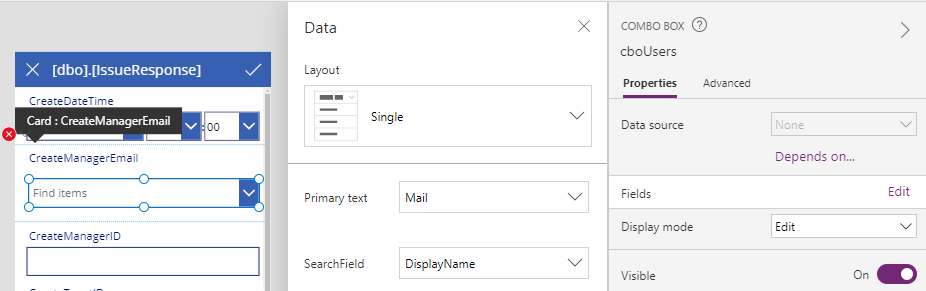
Finally, we can set the SelectMultiple property to false. This configures the combo box to allow the selection of a single email address only.
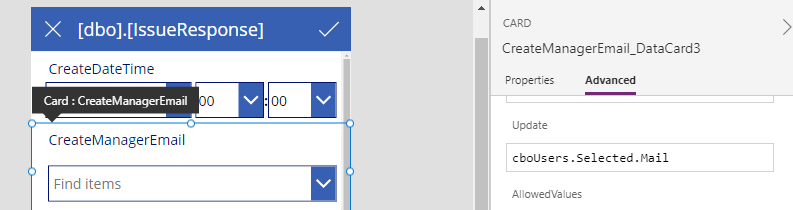
Configuring the form to save the email address
To update the form so that it correctly saves the email address, we set the update property of the card to:
cboUsers.Selected.Mail
Setting the value of the combo box for existing records
To update the form so that it correctly displays the email address for existing values, we set the DefaultSelectedItems property of the combo box control to:
Table({Mail:ThisItem.CreateManagerEmail})
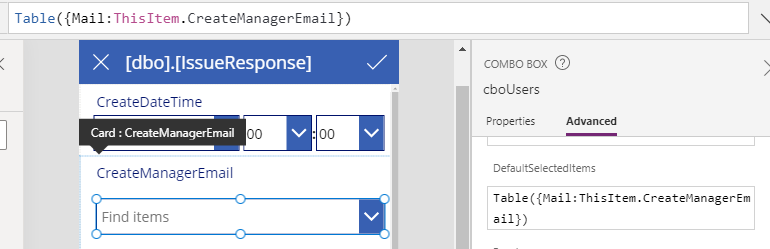
Because the DefaultSelectedItems property expects a table value, we call the Table function to construct a table that consists of a single record with a field name called Mail that contains the email address for the record.
Note that to set the selected item of a combo box, it's not possible to use the default property. We must use the DefaultSelectedItems property as shown here.
At this stage, we can run our app and we can use it to save and to retrieve email addresses using a combo box.
What happens when a user leaves an organisation?
Because we set the DefaultSelectedItems of the combo box to a table that we constructed with a single email address (rather than lookup the email with the Office365Users connector), the advantage of this is that the combo box control will still show existing email address that no longer available through the Office365Users connector.Conclusion
A common requirement is to build data entry screen where users can enter
and retrieve email addresses using a combo box that displays the users in an organisation through the Office365Users connector. This post described the steps to build this feature.
