Beginning PowerApps Book Overview

Beginning PowerApps provides practical guidance on how to build business apps. The book assumes no prior knowledge and shows you how to get started, from the very beginning. The first section of the book covers elementary topics such as how to retrieve and update data from a data source, how to build screens, and how to configure the navigation linkages between screens.
The next section of the book describes screen controls, how to capture photos, how to retrieve location details with GPS, and how to display data with charts. It also provides a reference guide for formulas and the common data service (CDS).
The final part covers some more advanced techniques, including how to configure security, how to import and export data, and how to build apps that work offline. This part of the book also describes how to use Flow, and how to call third-party web services.
To find out more, you can use the links on this page to find a more precise summary of what each chapter contains.
Chapter 1 - Introducing PowerApps
Let's suppose that we want to build a mobile app. Can PowerApps fulfill our exact requirements? In this chapter, we'll take a look at what we can accomplish with PowerApps. We'll explore what a typical app looks and feels like, and we'll cover the steps that are needed to build an app.
A great resource that Microsoft provides are template apps (as shown beneath). We can use these to learn how to build features and to find code samples for re-use in our apps. This chapter summarizes the features in these apps so that we know which template app to turn to for extra guidance in any particular area.
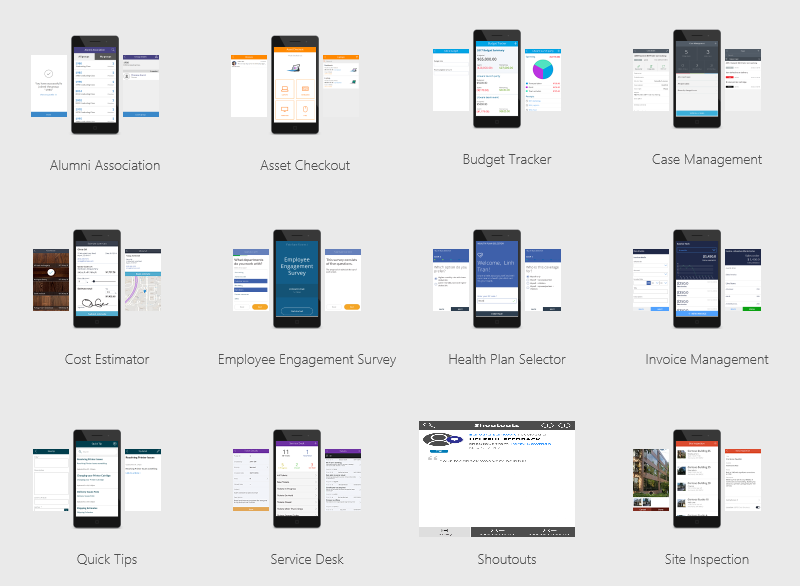
Figure 1-1 - Template app screenshots
Chapter 2 - Subscribing
Microsoft provides several subscription options that vary in price and features. This chapter describes how to subscribe to PowerApps and how to avoid the difficulties that users sometimes encounter. This includes the subscription plans that are available, and the inability to subscribe with certain email account types (e.g, .gov and .edu addresses). This chapter also introduces Office 365 and other Microsoft cloud services.
The authentication mechanism that Microsoft provides can be very confusing. For example, in the screenshot that's shown below, which option should you choose? Work or school account, or Personal account? This chapter clarifies the login process, and describes how the authentication mechanism works.
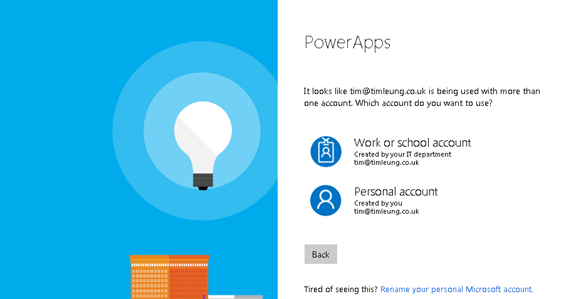 Figure 2-1 - Which account type should you choose?
Chapter 3 - Creating your First App
This chapter describes how to create a basic ‘auto-generated’ app that connects to data. It’s simple to build this type of app because we can point PowerApps at a data source and tell it to build an app from existing data. However, because PowerApps carries out all the hard work, it can be difficult understand how the resulting app works.
This chapter explains how to prepare an Excel spreadsheet for use in PowerApps. This step is important because PowerApps can only connect to spreadsheets that are set up in a certain way. It also describes how form and card controls work (these are controls that enable users to view and edit individual records), and how the data update and retrieval process works.
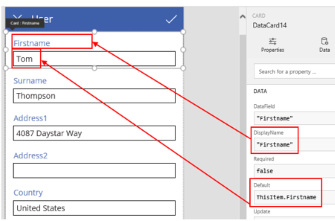 Figure 3-1 - A screenshot from the book, showing card properties
An important topic that this chapter describes is how screen navigation works, and the formula we use to open an individual record when a user selects an item from a list of records.
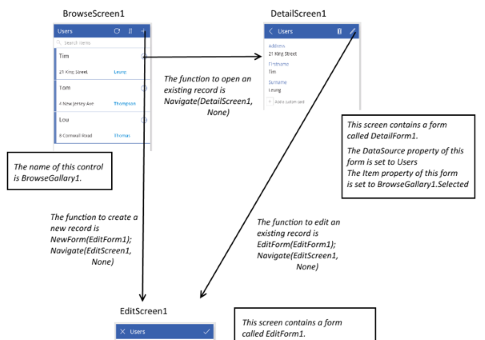 Figure 3-2 - A screenshot from the book, describing the navigation process
Chapter 4 - Running and Sharing your App
In this chapter, we'll find out how to make apps available to individuals, or groups of users. We'll cover the important topic of how to configure data connections when publishing an app. In certain cases, PowerApps can share data connections with end users. It's important to understand how this works because this determines whether end users need to provide data source credentials when they start an app.
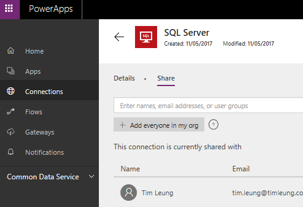 Figure 4-1 - A screenshot from the book, sharing data sources
We'll also look at to manage app versions. This feature is helpful because it enables us to restore a previous version of an app if we accidently publish updates that contains breaking changes.
In terms of managing apps, we'll also find out how to move apps between environments or organizations. In the final part of this chapter, we’ll examine syntactical differences and other issues when running apps in a non-English locale.
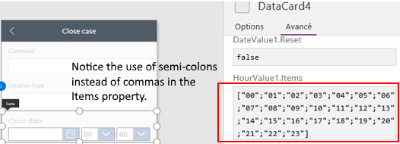 Figure 4-2 - An example of syntax differences in French
Chapter 5 - Data Sources
This chapter describes the data sources that PowerApps supports. We'll find out how to use the Common Data Service (CDS), a data store that works hand in hand with PowerApps. We'll look at how to get the most out of the CDS, including how to configure lookup data and how to create hierarchical data models.
 Figure 5-1 - Working with the CDS
Next, we'll also look at one the most outstanding features of PowerApps - the On-Premises Data Gateway. This feature enables us to connect to SQL Server and SharePoint servers that are inside internal company networks. For readers who are new to SharePoint, this chapter provides an introductory guide on how to set up a SharePoint list and how to configure choice items.
Finally, we'll explore how to utilize data sources in innovative ways, including how to add translation capabilities with the Bing transation connector, and how to display the current weather on a screen with the MSN weather service.
 Figure 5-2 - Translating data in PowerApps
Chapter 6 - Using Formulas
PowerApps uses formulas to carry out tasks, just like Excel. This chapter provides usage examples of the most useful functions, and also acts as a reference guide that we can refer to throughout the book.
The first part of this chapter describes how to write formulas and how to use variables. Variables form a crucial part of app development because they are central to the way in which we assign property values in PowerApps.
 Figure 6-1 - Why variables are important
We'll look at how to call functions that apply to text, number, and date values. This includes how to format text and how to carry out mathematical tasks, including date arithmetic and trigonometric functions. To demonstrate, we'll find out how to apply pattern matching techniques to verify the format of data that a user enters. This useful technique enables us to validate social security numbers, postal codes, phone numbers and more.
This chapter also provides practical guidance on how to work with collections and tables of data, including how to find the average, minimum, maximum, and other aggregate values from a set of data. To demonstrate how to apply bulk operations to multiple rows, we'll convert a table of mileages from miles to kilometers with a single formula. We'll also look at how to carry out row-by-row processing in order to carry out more complex tasks.
Next, we'll look at techniques that are associated with launching PowerApps, as
well as other navigation techniques. Specifically, we'll discover how to store screen references to enable us to
launch screens depending on conditions. We'll look at how to launch
websites, compose emails, send SMS messages and many more from within
PowerApps. We'll also find out how to build an app that can optionally show a specified
record at startup.
 Figure 6-2 - Building navigation menus with tables
In the final section of the book, we'll also find out how to build an app that can optionally show a specified record at startup. We'll also explore what happens when an app encounters an error.
 Figure 6-3 - Screenshot from book - exploring what happens when errors occur
Chapter 7 - Customizing Screen Layouts
Many users, including myself, learned how to use PowerApps by studying the built-in template apps. These apps provide sophisticated and good-looking examples of what we can achieve with PowerApps. However, it can be a challenge for beginners to make sense of how they work. These apps can be complex and it’s difficult to decipher how all the different parts fit together. Therefore, the theme of this chapter is document the interesting features within these apps. We can apply the lessons that we learn here to improve the presentation of our own apps.
In the first part of this chapter, we'll look at how to apply pre-built layouts to screens, gallery controls, and forms. We’ll examine the effect these layouts have on the appearance of an app and we’ll also find out how apply a consistent color scheme to an app through themes.
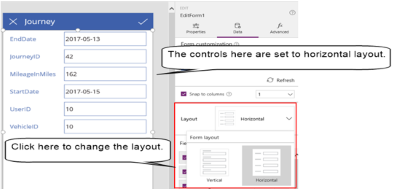 Figure 7-1 - Screenshot from book, how to apply layouts
A common screen layout includes two sections: a section that shows a list of records, and a section that shows the details of the selected record. The user can change the selected record by clicking a record from the list. We'll find out how to construct this type of screen layout. We’ll also find out how to implement a tab control. This allows the user to change the details that are shown in a pre-defined section of a screen.
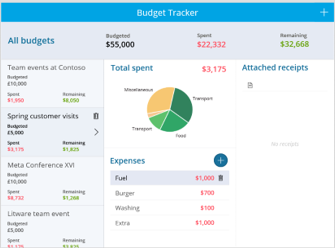 Figure 7-2 - We'll look at how to create 'list and detail' type screens
In the final part of this chapter, we’ll find out how to add features to help improve the user experience. This includes how to show a confirmation screen when a user attempts to delete a record and how to display summary data when a user selects a record from a list. This summary data can include counts of child records, or totals and summaries of financial values.
 Figure 7-3 - How to build delete confirmation dialogs
Chapter 8 - Using Controls
Controls provide the means for users to interact with apps and play a crucial role in app design. In this chapter, we'll cover this important topic through four sections: how to work with simple controls, how to set lookup values, how to work with CDS specific controls, and how to show media content on screens.
The overriding characteristic of simple controls is the ability to work against single values. Examples of these controls include the text input, radio, checkbox, and many more. When working with simple controls, it's common for a data source to store codified or abbreviated data values. Examples can include country code abbreviations, or letters such as 'Y' and 'N' to denote true or false It can be a challenge to configure controls such as radio or list box controls to display meaningful options to the user, yet store and retrieve codified values from the data store. We'll find out exactly how to carry out this mapping task.
 Figure 8-1 - Displaying descriptions in a control whilst storing codified values in the data source
Next we'll look at how to use the drop down control. To address the common task of setting lookup values, we'll examine some tricky yet important topics that relate to this control. This includes how to customize the text that appears in each row, and how to build a set of nested drop down controls. This is where the data items in one drop down will depend on the selected item of another drop down.
 Figure 8-2 - Using drop down controls
This chapter also explains how the date picker control works, and how to work with dates and times. Surprisingly, displaying and editing dates can be quite complex. Firstly, it's not straightforward to configure the controls on a default card to allow just the entry of the date without the time component. Secondly, PowerApps performs time zone conversions to allow users in different regions to work with times in their local time zone. The difficulty is that if we misconfigure our apps, we can store incorrect time values the data source. In this chapter, we'll find out how to avoid these problems.
 Figure 8-3 - Working with dates and times
Other topics that we'll cover in this chapter include the differences with CDS data sources. This includes a new type of form control (the entity form control), and different behavior with drop down boxes. We'll also cover the use of media controls, including how to display images, videos, and audio in apps.
In the final part of this chapter, we'll walk through some practical techniques that we can apply. This includes how to use the timer control to run formula at timed intervals, and how to utilize the control reset feature. This feature restores control values back to their initial states, and we'll find out how to use this to allow users to undo changes to a record.
Chapter 9 - Working with Data
In this chapter, we'll look at how to perform data related tasks with formula. This is an important topic because it opens many new possibilities. By accessing data with formula, we can build better search capabilities, show more pertinent information, and provide better data entry screens. This chapter describes how to build features to improve the usability of our apps.
The auto-generated apps provide basic search capabilities. But what if we want to filter records by date, drop down values, or show records that match a list of items? In this chapter, we'll walk through the steps to build exactly this type of functionality. In building this search screen, we'll find out how to carry out useful data tasks. This includes how to union (or combine) sets of data. In this case, we'll use this technique to display an additional row in the search criteria drop down, as shown below.
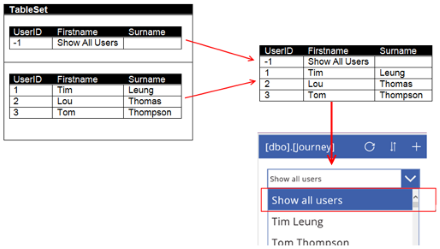 Figure 9-1 - Building a search screen - combining rows in a search criteria drop down
In this section, we'll also examine data related issues such as performance, delegation, and a 500 row limit that PowerApps imposes.
 Figure 9-2 - Understanding performance and query delegation
Taking the typical example of an order processing app with two tables, customers and orders, how do we join these tables to show the customer detail that's associated with an order? How can we show customers who have not made orders, or show the distinct customers who have made orders? How can we group and ungroup sets of data? In this section of the book, we'll look at how to carry out all of these tasks.
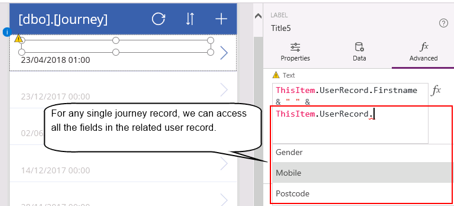 Figure 9-3 - Screenshot from book, an example of how to display related data
In the next section, we'll look at how to retrieve, add, update, and delete records with formula. We'll walk through how to update a field without showing or loading the entire record. Next, we'll look at how create records in multiple related tables in one go. This includes the task of how to retrieve server generated primary key values prior to inserting child records.
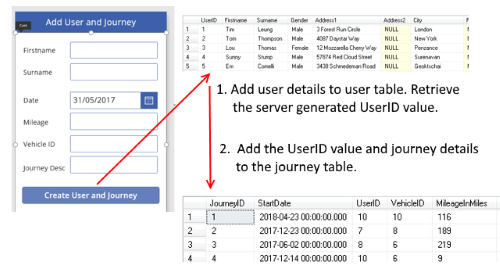 Figure 9-4 - Inserting data into multiple tables
Other topics that we'll cover in this chapter include how to set default values on new records and how to validate data.
 Figure 9-5 - Validating data
In the final section of this chapter, we'll look at how to react to changes in data by displaying alerts in the notifications af mobile devices. The screenshot beneath shows the alert that appears when any user adds a new record to the database.
 Figure 9-6 - Displaying alerts on mobile devices
Chapter 10 - Taking Pictures
With PowerApps, we can access the cameras that are built into smart phone and tablet devices. In this chapter, we'll find out how to take photos and how to perform image related activities such as scanning barcodes and receiving pen input.
At the start of this chapter, we'll walk through the steps to build an auto generated app that stores and retrieves images. We'll find out how to configure a data store to store images. To store images in an Excel data store, it's necessary to setup a spreadsheet in a specific way and we'll find out exactly how.
We can use a file selection control or a camera control to select images. It can be tricky to work with these controls because depending on circumstances, the control value can return binary data, or a pointer to a file in a private storage area. We'll clarify exactly the data that these controls return.
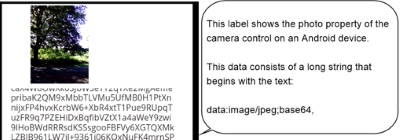 Figure 10-1 - Screenshot from book, understanding how the camera and image controls work
Next, we'll find out how to display images by exploring how the site inspection template app implements an image gallery screen.
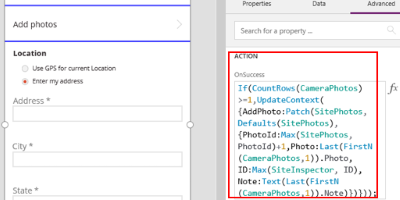 Figure 10-2 - The formula to build an image capture and gallery screen
In the final part of this chapter, we'll find out how to perform other image related activities, such as scanning barcodes and using the pen control. We'll walk through the steps to build a screen that converts handwriting to text.
 Figure 10-3 - Building a screen to convert handwriting to text
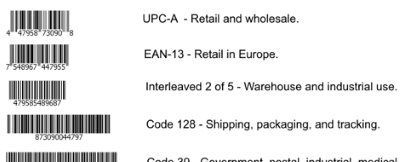 Figure 10-4 - Understanding barcodes
Chapter 11 - Maps and Locations
PowerApps is designed for mobile devices and therefore works naturally with location services. This chapter focuses on how to retrieve and display location details. In the first section, we'll find out how to retrieve values such as longitude, latitude, compass bearing, and acceleration details.
 Figure 11-1 - Screenshot from book, retrieving location details
Next, we'll look at how to save location details. To do this, we'll create an auto-generated app and go through the steps to enable users to retrieve and save location details through the edit form.
This section also describes a useful technique, which is how to work with a snapshot of a location at a given moment in time. For example, let's imagine that we've built an app that captures photos and stores the location where the photos were taken. In this scenario, it wouldn't be accurate to retrieve the location at the point when the user saves the record. If the user were travelling in a car, there could be a considerable difference in distance between the time when the user takes the photo and the time when the user saves the record. To address this, we'll look at formula that we can use to overcome this problem.
In the final part of this chapter, we'll find out how to use mapping services to pinpoint locations. We'll cover two of the most popular services - Google maps and Bing maps.
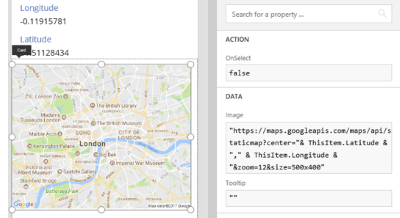 Figure 11-2 - Screenshot from book, displaying locations with Google Maps.
Chapter 12 - Using Charts
To help users visualize data, PowerApps offers a range of chart controls. Although these are simple to use, a difficult challenge is to work out how to convert a set of raw data into a format that enables the chart control to display our desired view of the data. This type of data aggregration can be difficult to implement so in this chapter, we'll find out how to carry out these steps. We'll also look at what chart controls are available and how to configure settings such as the the legend text, colors, and labels.
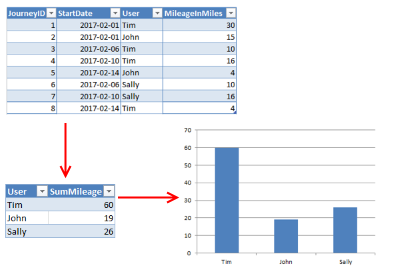 Figure 12-1 - Preparing source data for use with the chart control.
For planning and measurement purposes, a common business requirement is to show how figures change over a given time. We'll find out how to summarize data in this way and to demonstrate a more complex example, we'll find out how to show multiple series on a single chart.
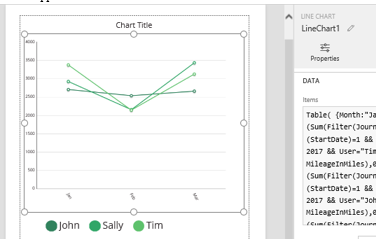 Figure 12-2 - Showing multiple series on a chart.
In the final part of this chapter, we'll find out how to configure the data on a chart to change dynamically, depending on criteria that a user enters through screen controls. This technqiue provides users with the flexibility to vizualise data in ways that can better aid decision making.
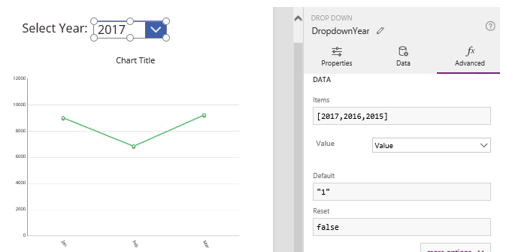 Figure 12-3 - Displaying chart data based on user criteria.
Chapter 13 - Securing Applications
The ability to secure apps and data is important, particularly given the ease with which we can build apps that connect to sensitive commercial data. In this chapter, we'll investigate how to keep our apps and data safe.
In the first part of this chapter, we'll find out how to strengthen the login process by authenticating users based on one-time SMS text message codes. This provides a higher level of security, compared to using usernames and passwords.
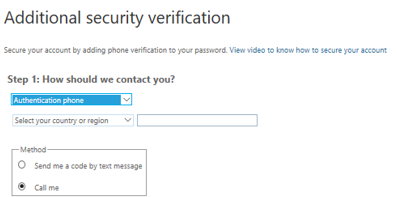 Figure 13-1 - Authenticating users by SMS text messages.
Next, we'll look at how to grant or deny user access to underlying CDS or SharePoint data sources. We'll also find out how to secure access to individual records. This technique is useful because we can restrict users to viewing only the records that they create. In this section, we'll also find out how to secure access to screens and features.
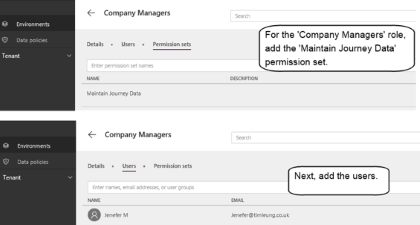 Figure 13-2 - Screenshot from book, setting up role access
.
In the final part of this chapter, we'll find out how to use data loss prevention policies. These policies prevent users from copying data from internal on-premise data sources to external cloud data sources.
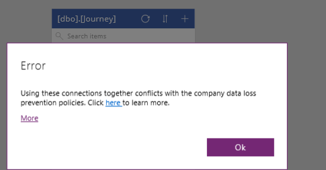 Figure 13-3 - Data loss prevention policies can prevent users from moving data outside of your organization.
Chapter 14 - Importing and Exporting Data
Getting data in and out of PowerApps is useful because it enables apps to integrate with wider business processes. Exporting data is particularly useful for reporting and backup purposes. Importing data can be very useful for data migration purposes, or for setting up apps for first time use.
There are several ways to import and export data from PowerApps. These techniques may appear straightforward but beyond the simple task of working with a single table of data, there are some difficult challenges that we can face. To import sets of related data, how do we maintain the linkages between parent and child records? If we import data to a system that contains existing records, how do we build a synchronization process to add non-existent records and to update the existing records? This chapter will answer these questions.
In the first part of this chapter, we'll look at how to provide import and export capabilities to end users. PowerApps provides import and export controls that we can add to screens. However, it's not obvious how these controls work. In this chapter, we'll find out exactly how to use these controls.
 Figure 14-1 - Using the import and export controls - how to diagnose import errors.
Next, we'll look at the CDS and we'll find out how to use the features in the portal to import and export data. We'll also look at techniques that can help us resolve import failures.
Finally, we'll find out how to view, copy, and edit CDS data directly from an Excel spreadsheet. This technique enables us to copy and paste multiple rows of data.
 Figure 14-2 - Screenshot from book, managing CDS data from Excel
.
Chapter 15 - Using Flow
By integrating our apps with Microsoft Flow, we can build more rounded and complete solutions. Microsoft Flow fills the gaps that PowerApps leaves behind and enables us to perform tasks beyond the limits of PowerApps.
Microsoft Flow is a workflow system. It enables us to carry out actions independently of PowerApps when some event occurs. Unlike other workflow systems, it is designed for non-programmers.
At the start of this chapter, we'll cover basic concepts such as what we can do with flow and how to call flows from apps. To demonstrate the use of flow, we'll walk through the steps to build a process to copy files from OneDrive (or any other cloud storage provider), to a location on our internal network. Next, we'll walk through the steps to send email notifications and to develop approval processes. These are some of the typical tasks that flow is designed for.
With Microsoft Flow, we can access records from all the same data sources that we can access in PowerApps. To filter records, we use operators that are based on a protocol called OData. And to carry out other programming tasks such as program control, string manipulation, and date formatting, we can use a language called workflow definition language.
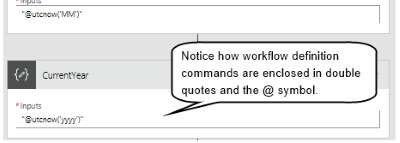 Figure 15-1 - Using workflow definition language.
Sometimes, it's necessary to mix OData operators and workflow definition language. An example is where we want to filter records by a programatic expression. The challenge here is that we need to escape expressions in a way that might not be obvious. Within this chapter, we'll find out how to tackle such tricky syntatical issues.
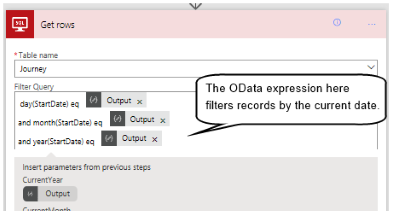 Figure 15-2 - Combining OData and workflow definition expressions.
In the email notification example, we'll populate the email body with data from a database. We'll also find out how to conduct row by row processing, and how to call SQL Server stored procedures. Stored procedures can help improve performance and to overcome some of limitations that delegation imposes.
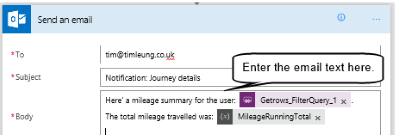 Figure 15-3 - The email example shows how to provide summary and mathmatical results in the email body.
In the final part of this chapter, we'll look at approval processes. We'll learn how to build workflows that require approval from other users. Such flows can react differently depending on the approval outcome. We'll find out how to configure a flow that requires approval from multiple users, or approval from a single user out of a list of possible approvers.
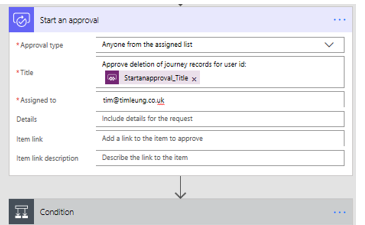 Figure 15-4 - Creating approval processes.
Chapter 16 - Working Offline
PowerApps is designed for mobile devices and there are times when these devices lose connectivity with the Internet. The ability for users to continue working during these times can be extreamly useful. This is esepcially true for field workers, users that work outside regularly, or users that travel often.
To cater for these scenarios, PowerApps provides the ability to cache data on the local device. We can use this feature to build apps that can work offline. However, building an app that works completely offline is a manual task and it introduces a very difficult challenge - how to synchronize data and to resolve conflicts.
If an offline user modifies a record that another user modifies during an offline session, who wins? Can we merge changes from two users together? And how do we cope with situations where an online user deletes the record that an offline user modifies? In this chapter, we'll find out the answers to these questions.
At the start of this chapter, we'll look at how to view data offline. We'll find out how to cache data to the local device, and how to detect offline conditions. When an app becomes offline, we'll find out how to display the cached data.
Next, we'll find out how to add and update records when a user is offline. We'll develop a system to enable the offline update of data.
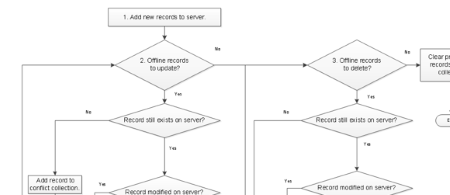 Figure 16-1 - A flowchart that summarizes the formula that we'll use to synchronize offline changes.
Finally, we'll find out how to build a conflict resolution screen. When conflicts occur, users can use this screen to retain the offline record, or to revert to the most recent server version of the record.
 Figure 16-2 - The conflict resolution screen.
Chapter 17 - Custom Data Connectors
PowerApps supports a wide range of data sources through its built-in data connectors. But what if we want to access data sources that are not natively supported - is this possible? The answer is yes. By building a custom data connector, we can connect to any data source that is accessible through a web service. And if our required data source doesn't include a web service interface, we can overcome this by building our own web service (although this falls outside the scope of this book).
For non-developers however, this topic can involve lots of confusing jargon. This includes words such as Restful services, JSON, and Swagger. To make this task as simple to understand as possible, we'll walk step-by-step through a practical example of how to call a post code lookup service. The purpose of this exercise is to provide a means for users to enter data more quickly and easily. By the end of this chapter, you'll be able to apply the same techniques to add similar valuable features to your apps. .
 Figure 17-1 - Adding Zipcode lookup functionality to an app.
In the first part of this chapter, we'll look at what we can accomplish through web services and how the web works. This chapter explains the technical jargon that surrounds this topic and describes how web requests and responses work. This provides useful background knowledge for later parts of this chapter and beyond.
Next, we'll build a custom connector that connects to our post code lookup service. The steps that we'll cover include how to create a web service description file and how to register the service with PowerApps. We'll cover the two popular tools - Postman and Swagger.
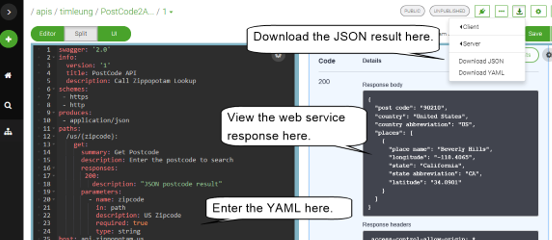 Figure 17-2 - Creating a Swagger definition.
Appendix A - Data Models
The built-in standard entities in the CDS support many common business scenarios. However, it can often be difficult to find the entities to cater for a specific requirement because there are more than 90 standard entities, and it's difficult to know where to start.
To bring some clarify, this appendix offers an overview of the standard entities and provides a summary of the names, fields, and relations between the entities.
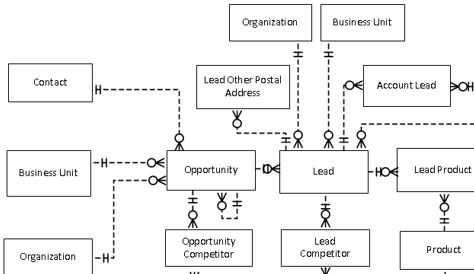 Figure A-1 - CDS data model diagrams.