Controls - How to Transition/Show/Hide controls with a Sliding Effect
When navigating screens, we can pass a transition effect to the Navigate function. There are various options for uncovering/sliding the new screen into view, and the documentation provides animated gifs that show the available transition effects.
Related to this topic is a question that I occasionally see. That is - how can we apply a similar transition effect when we want to show or hide a control or container?
There is no built-in function that provides an animation effect. However, we can workaround this by using a timer control and writing formula to simulate an annimation effect.To learn more about this technique, the best resource I recommend is Mr Dang's video beneath.
Mr Dang's video provides a great explanation, so there's no need for me to repeat what he teaches.
What is the High Level Methodology?
Let's suppose we place a rectangle on a screen and we want to hide it. The strategy is to use a timer control. We set the duration of the timer to a given time (say 2 seconds). On each 'tick' of the timer, we incrementally reduce the width of the control over the duration of the timer, until the control width reaches zero. At this point, the rectangle will appear invisible.Sliding a control into view would apply the inverse of the above operation.
What's the problem/challenge with this technique?
Let's say we reduce the width of the control by a fixed number of pixels on each tick of the timer. In practice, the visual effect of this will not look inspiring.
We improve the visual effect by controling the speed at which the width of the control reduces. If the control begins to hide slowly and increases in speed over time, it introduces a sense of fluidity, or a life like feel that vastly improves the visual effect.
We improve the visual effect by controling the speed at which the width of the control reduces. If the control begins to hide slowly and increases in speed over time, it introduces a sense of fluidity, or a life like feel that vastly improves the visual effect.
What is an Easing Equation?
To change the rate at which we reduce the width of the control, we apply something called an easing equation, or an interpolation function. The easing equation typically produces an output that's based on a sine wave. We use
this output to regulate the rate at which we reduce the width of our
control.
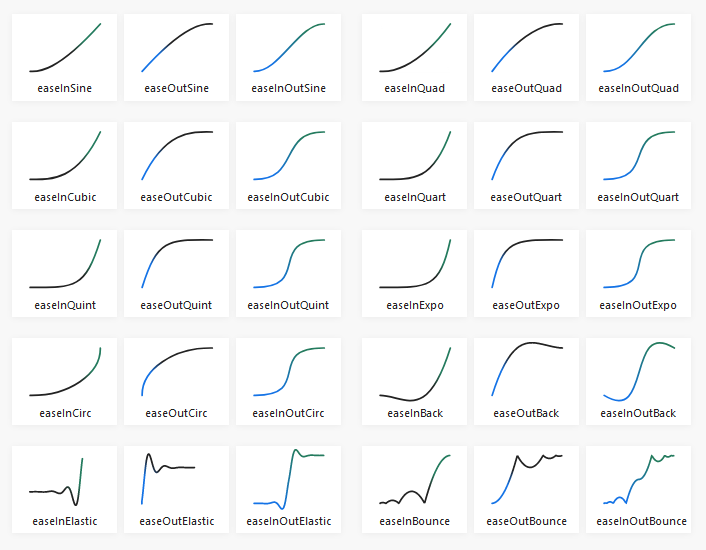
A great place to learn more about this is https://easings.net/ - an open source resource where we can find easing formulas. The screenshot beneath is taken from this website.
As we can see from the screenshot that's taken from this website, if on
each tick of the timer, we reduce the width of our control by a multiple that corresponds to the output of the easeInSine function, we can increase
the rate at which the control hides.
Implementation of this technique in Power Apps
To demonstrate this technique, here's the formula that Mr Dang uses to slide a rectangle (Rectangle1) out of view.
There are 2 controls in play:
- A Timer control (Timer1)
- A button that starts the timer, and toggles the value of a Boolean variable called varShow
To produce the effect, Mr Dang sets the X position of Rectangle1 to the following formula. Note that this technique is slightly different to one I describe because he slides the X value of the rectangle outside the visible screen area to hide the control (rather than reduce the width).
If(varShow,
    //Close the distance to be moved by subtracting a fraction of the Rectangle's full width at a time
    //Use the Cosine function for a smoother calculation than linear
    -Rectangle1.Width * Cos(Timer1.Value/Timer1.Duration * (Pi()/2)) + Rectangle1.Width
    //Compensate for the original position off the screen
    + -Rectangle1.Width,

    //If you are hiding the rectangle, start from where it ended up when being shown.
    //In this case, it arrived at 0.
    0-
    //Gradually subtract the width of the rectangle (see top formula)
    (-Rectangle1.Width * Cos(Timer1.Value/Timer1.Duration * (Pi()/2)) + Rectangle1.Width)
)
To complete this, we need to apply a few other 'control' issues that Mr Dang describes in his video. But this in essence is the key part of technique.
Finally, here's the website with the formula references that Mr Dang mentions in his video.
Conclusion
There is no built-in function to hide/show controls with an animation effect. However, we can use a timer control and the easing equation technique that Mr Dang teaches to achieve this result.
