Power Up Course - How to Display Dataverse Multi-Choice Select Column Description Values in Power BI
This post describes 3 ways to retrieve the choice descriptions using the following techniques:
- Hard coding the value and description pairs
- Dynamically retrieving the value and descriptions for local choice option sets
- Dynamically retrieving the value and descriptions for global choice option sets
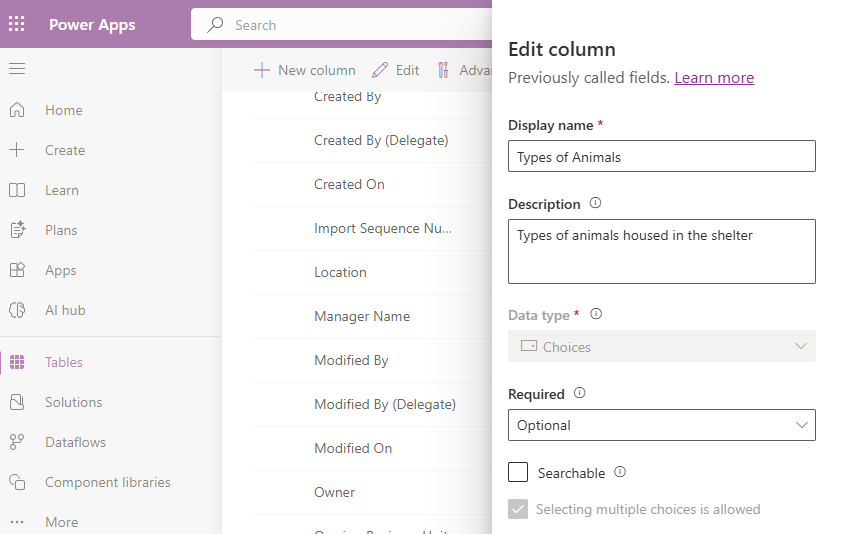
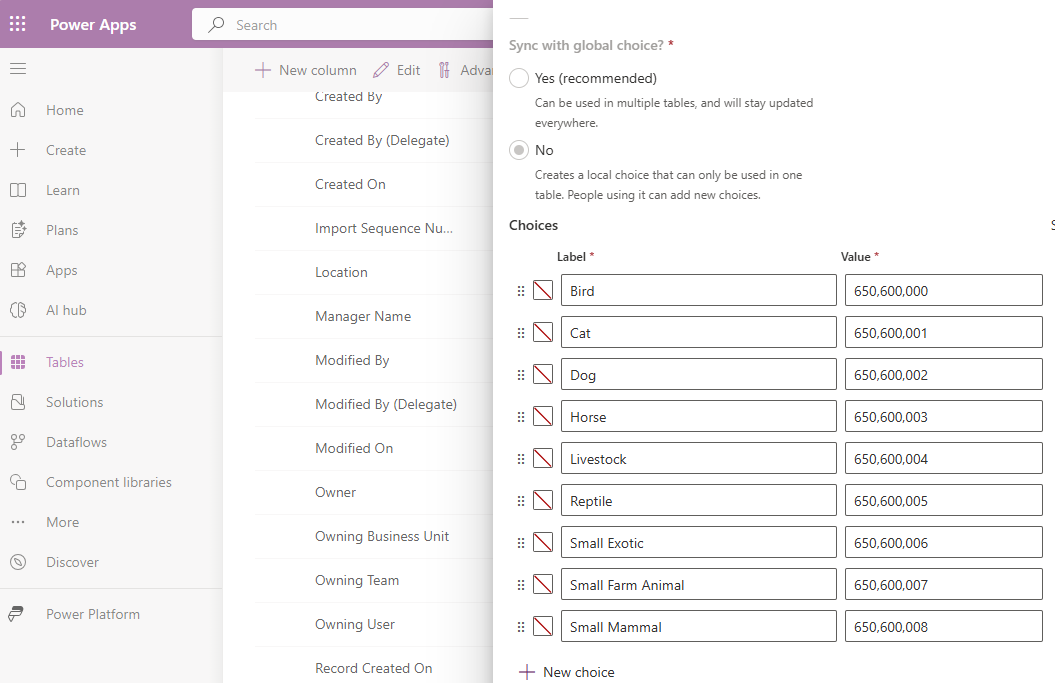
Setting up the sample data
Technique 1 - Using Statically Defined Values
The simplest way to display these descriptions in PowerBI is to write DAX with Label/Value pairs hardcoded.
Here's how to do this with statically defined values:
- Open Power BI Desktop and add the "Shelter" table to the data model.
- Go to the "Model" view and select the "Shelter" table.
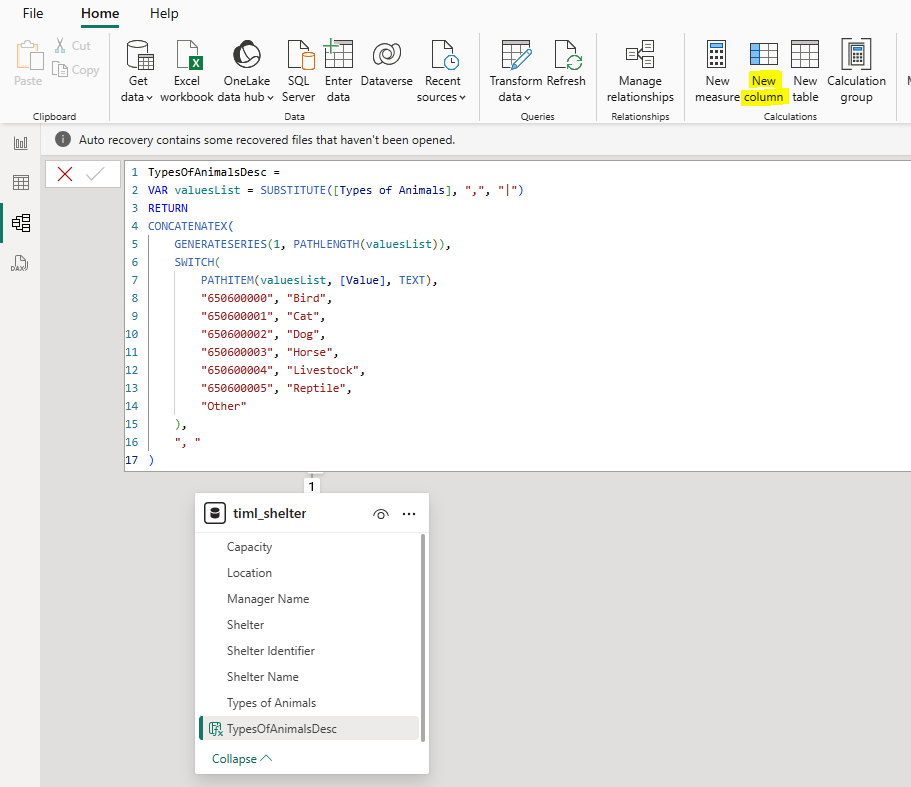
- Create a new column by clicking the "New Column" button in the ribbon.
Enter the following DAX formula for the new column:
TypesOfAnimalsDesc =With this DAX formula, the SUBSTITUTE function replaces commas with pipes. The GENERATESERIES function creates a series of numbers, and the call to SWITCH maps each value to its corresponding description.
VAR valuesList = SUBSTITUTE([Types of Animals], ",", "|")
RETURN
CONCATENATEX(
GENERATESERIES(1, PATHLENGTH(valuesList)),
SWITCH(
PATHITEM(valuesList, [Value], TEXT),
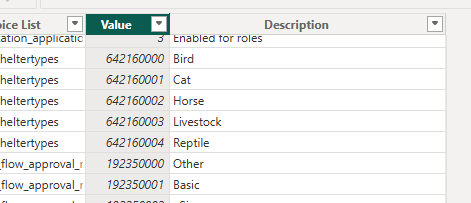
"650600000", "Bird",
"650600001", "Cat",
"650600002", "Dog",
"650600003", "Horse",
"650600004", "Livestock",
"650600005", "Reptile",
"Other"
),
", "
)

Technique 2 - Using Dynamically Obtained Values via the API - Local Choice
Whilst hardcoding the Label/Value pairs is simple, it can be better to obtain the descriptions dynamically via the Dataverse API.
This method is beneficial because it ensures that the data remains up-to-date with any changes in the source system, reducing the need for manual updates. The steps to carry this out are based on this great article by LauraGB, so I recommend referring to it for additional detail.
https://hatfullofdata.blog/power-bi-dataverse-choices-and-choice-column/
Build the address to the API endpoint
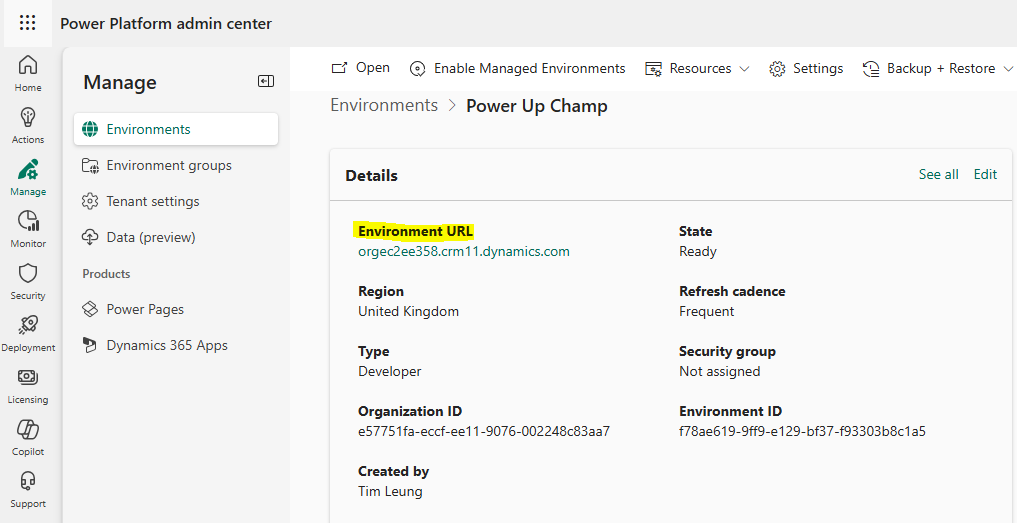
The first step is to discover the URL for your environment. Open the "Power Platform admin center" using the link below and find the Environment URL. Make a note of this value.
https://admin.powerplatform.microsoft.com/manage/environments
We can then construct the Endpoint URL in the following format:
"https://[EnvironmentURL]/api/data/v9.0/EntityDefinitions(LogicalName='[TableName]')/Attributes(LogicalName='[ChoiceColumName]')/Microsoft.Dynamics.CRM.MultiSelectPicklistAttributeMetadata?$select=LogicalName&$expand=OptionSet($select=Options)"
The 3 parts to substitute are the EnvironmentURL, TableName, and ChoiceColumnName values. The TableName and ChoiceColumnName values should be the logical values.
For example, the logical name of the table I'm using is timl_shelter (highlighted below)..
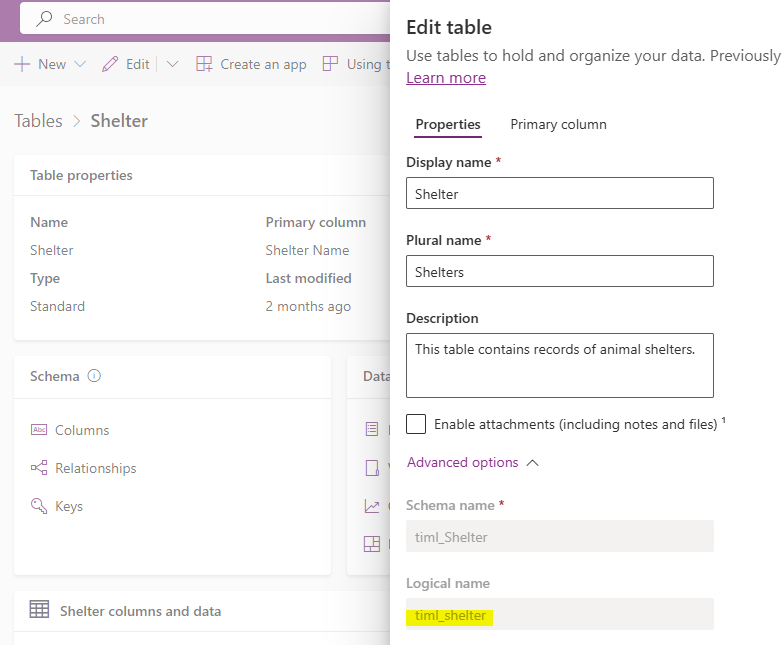
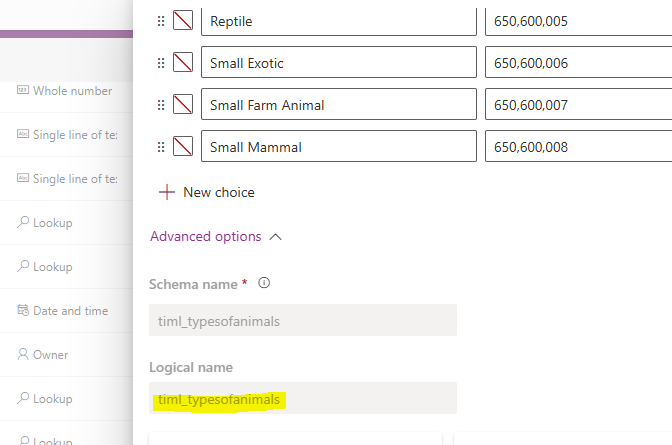
In the 'Edit Column' panel of the choice column, we see that the logical name of the choice column is timl_typesofanimals.
Once we've constructed the URL, the next steps are as follows:
- Open Power BI Desktop and go to the "Home" tab.
- Click on "Transform data" to open Power Query Editor.
- Create a new query to call the API by clicking on "New Source" > "Blank Query."
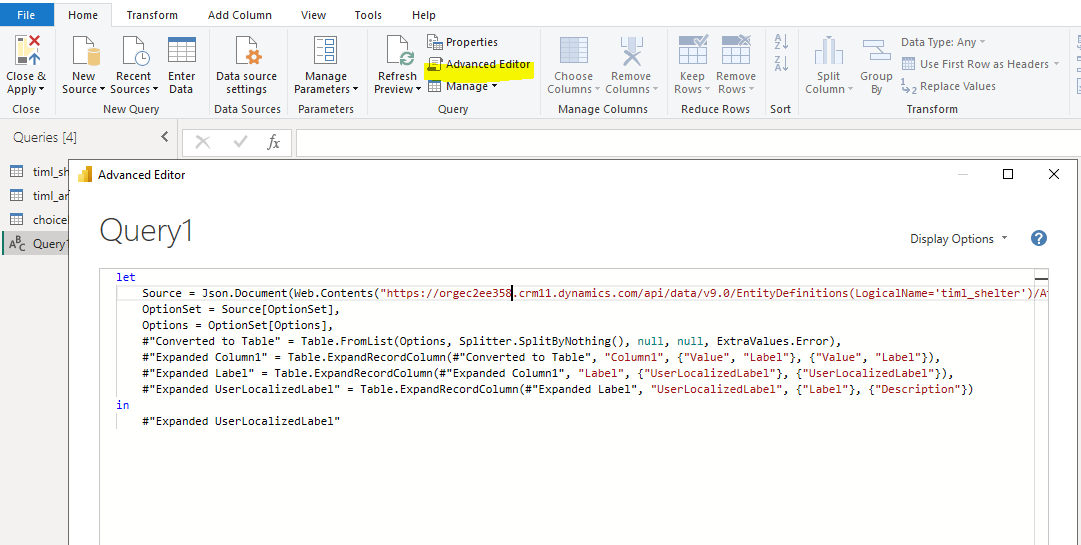
- Enter the following M code in the Advanced Editor. Make sure to substitute the endpoint URL with the one that you constructed above.
let
    Source = Json.Document(Web.Contents("https://orgec2ee358.crm11.dynamics.com/api/data/v9.0/EntityDefinitions(LogicalName='timl_shelter')/Attributes(LogicalName='timl_typesofanimals')/Microsoft.Dynamics.CRM.MultiSelectPicklistAttributeMetadata?$select=LogicalName&$expand=OptionSet($select=Options)")),
    OptionSet = Source[OptionSet],
    Options = OptionSet[Options],
    #"Converted to Table" = Table.FromList(Options, Splitter.SplitByNothing(), null, null, ExtraValues.Error),
    #"Expanded Column1" = Table.ExpandRecordColumn(#"Converted to Table", "Column1", {"Value", "Label"}, {"Value", "Label"}),
    #"Expanded Label" = Table.ExpandRecordColumn(#"Expanded Column1", "Label", {"UserLocalizedLabel"}, {"UserLocalizedLabel"}),
    #"Expanded UserLocalizedLabel" = Table.ExpandRecordColumn(#"Expanded Label", "UserLocalizedLabel", {"Label"}, {"Description"})
in
    #"Expanded UserLocalizedLabel"
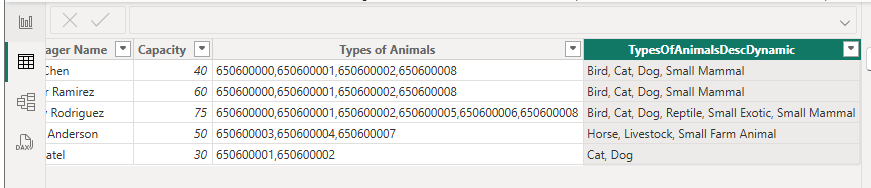
TypesOfAnimalsDescDynamic =In this approach, we dynamically fetch the descriptions from the Dataverse API and use LOOKUPVALUE to map the values to their descriptions. The end result is shown below.
VAR valuesList = SUBSTITUTE([Types of Animals], ",", "|")
RETURN
CONCATENATEX(
GENERATESERIES(1, PATHLENGTH(valuesList)),
LOOKUPVALUE(
choiceItemsLocal[Description],
choiceItemsLocal[Value], PATHITEM(valuesList, [Value], TEXT),
"Other" -- Default value if no match is found
),
", "
)
Technique 3 - Using Dynamically Obtained Values via the API - Global Choice
The previous section described how to work with a local choice set. If the column were a global choice set, we would need to change the endpoint URL that's used."https://[EnvironmentURL]/api/data/v9.0/GlobalOptionSetDefinitions"
Once we've constructed the URL, we follow the same steps as before:
- Open Power BI Desktop and go to the "Home" tab.
- Click on "Transform data" to open Power Query Editor.
- Create a new query to call the API by clicking on "New Source" > "Blank Query."
- Enter the following M code in the Advanced Editor. Make sure to substitute the endpoint URL with the one that you constructed above.
let
  Source = Json.Document(Web.Contents("https://orgec2ee358.crm11.dynamics.com/api/data/v9.0/GlobalOptionSetDefinitions")),
    value = Source[value],
    #"Converted to Table" = Table.FromList(value, Splitter.SplitByNothing(), null, null, ExtraValues.Error),
    #"Expanded Column1" = Table.ExpandRecordColumn(#"Converted to Table", "Column1", {"Name", "Options"}, {"Name", "Options"}),
    #"Expanded Options" = Table.ExpandListColumn(#"Expanded Column1", "Options"),
    #"Expanded Options1" = Table.ExpandRecordColumn(#"Expanded Options", "Options", {"Value", "Label"}, {"Value", "Label"}),
    #"Expanded Label" = Table.ExpandRecordColumn(#"Expanded Options1", "Label", {"UserLocalizedLabel"}, {"UserLocalizedLabel"}),
    #"Expanded UserLocalizedLabel" = Table.ExpandRecordColumn(#"Expanded Label", "UserLocalizedLabel", {"Label"}, {"Label"}),
    #"Changed Type" = Table.TransformColumnTypes(#"Expanded UserLocalizedLabel",{{"Name", type text}, {"Value", Int64.Type}, {"Label", type text}}),
    #"Renamed Columns" = Table.RenameColumns(#"Changed Type",{{"Name", "Choice List"}, {"Value", "Value"}, {"Label", "Description"}})
in
    #"Renamed Columns"
TypesOfAnimalsDescDynamic =
VAR valuesList = SUBSTITUTE([Types of Animals], ",", "|")
RETURN
CONCATENATEX(
GENERATESERIES(1, PATHLENGTH(valuesList)),
LOOKUPVALUE(
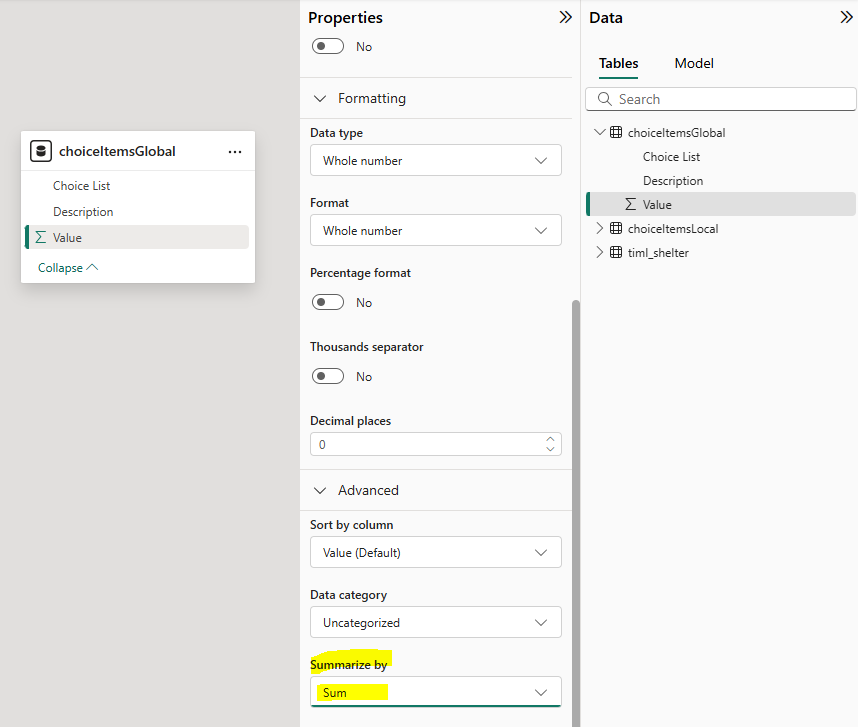
choiceItemsGlobal[Description],
choiceItemsGlobal[Value], PATHITEM(valuesList, [Value], TEXT),
"Other" -- Default value if no match is found
),
", "
)
