Data - How to save and retrieve Google contacts
The ability to access Google contacts can be very useful, particularly for organisations that use GSuite, or cases where app builders want to provide an easy way to retrieve, access, or to sync contact records from an Android device.
In this post, we'll walk through the syntax that we can use to retrieve and to add contacts to a Google account.
In this post, we'll walk through the syntax that we can use to retrieve and to add contacts to a Google account.
Introduction to connector
To use this connector in a canvas app, the first step is to add a connection through the data panel.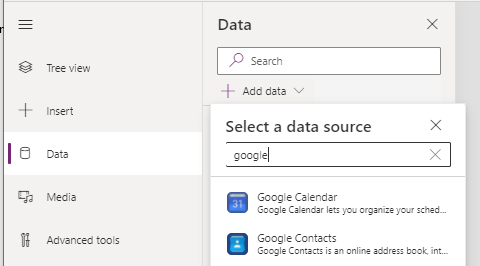
This connector offers two key actions - one to retrieve contacts, and the other to create a contact record. These actions have undergone several revisions and at the time of writing, the latest version of the 'get' action is version 4.
Compared to previous versions, this offers an improvement because previous versions would return a result set with the most prominent details in child tables, which were not organised in a very obvious way.
Limitation of the connector
Unfortunately, there's a significant limitation with this connector in that it can retrieve a maximum of 1024 contacts only. Here's what the documentation says:Known issues and limitations: Action "Get my contacts" currently does not support pagination. It returns 1024 contacts maximum. If you have more contacts, only first 1024 will be returned back by the action.
For further reading, the full documentation for the connector is here:
https://docs.microsoft.com/en-us/connectors/googlecontacts/
Retrieving contacts
To retrieve contacts, we call the PeopleApiListContactsV3 action. This returns a table called connections that contains the contact details.For example, to display contacts in a gallery control, we would set the items property to the following formula:
GoogleContacts.PeopleApiListContactsV4().connections
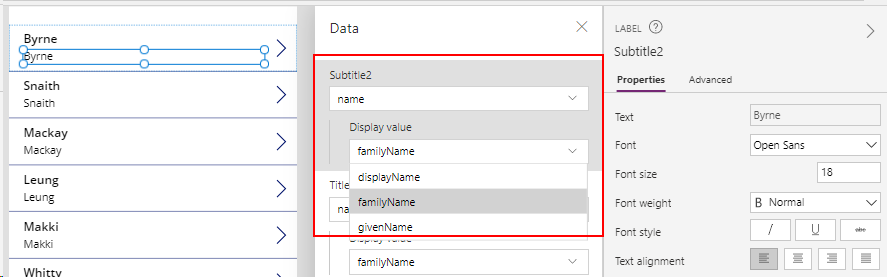
The gallery control displays all available contacts (up to a maximum of 1024). As the screenshot beneath shows, the results table contains a child record called 'name'. This exposes attributes that include family name, display name, and given name.
To illustrate the the connections table, here's a screenshot that shows the result when we collect the return value into a collection. As this screenshot shows, each contact record includes child tables with email addresses and phone numbers.
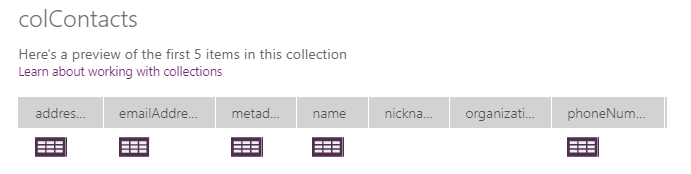
This schema supports the data structure where each contact can have multiple email addresses and phone numbers (e.g., for work, business,
and other). An easy way to display these child tables in a gallery
control is to add nested gallery controls, and to set the items property
of these controls to ThisItem.emailAddresses, and ThisItem.phoneNumbers.
Alternatively, to display the first email address or phone number that is associated with a contact, we can the set the text property of a label in the gallery control to the following formula:
//This returns the email type (eg, Home, work, other, etc)
First(ThisItem.emailAddresses).formattedType

//This returns email value (eg, [email protected])
First(ThisItem.emailAddresses).value

//This returns the phone number type (eg, Home, work, other, etc)
First(ThisItem.phoneNumbers).formattedType

//This returns phone number value (eg, 07985458965)
First(ThisItem.phoneNumbers).value
Searching contacts
To search for contacts, we can filter the PeopleApiListContactsV4().connections table. As an example, here's how to return all contacts with a surname that starts with "sm" :Filter(GoogleContacts.PeopleApiListContactsV4().connections,
StartsWith(name.familyName, "sm")
)
Creating contacts
To create a contact, we call the PeopleApiCreateContactV3 action. Here's the formula we can add to the OnSelect property of a button to create a contact.
GoogleContacts.PeopleApiCreateContactV3(
      "Tim",
      {
         familyName: "Leung",
         workEmail: "[email protected]",
         company: "Power Apps Guide Company",
         jobTitle: "App Builder",
         workPhoneNumber: "workPhoneNumber value",
         mobilePhoneNumber: "mobilePhoneNumber value",
         homeEmail: "homeEmail value",
         otherEmail: "otherEmail value",
         nickName: "nickName value",
         homeAddress: "homeAddress value",
         workAddress: "workAddress value",
         otherAddress: "otherAddress value",
         homePhoneNumber: "homePhoneNumber value",
         otherPhoneNumber: "otherPhoneNumber value"
      }
)
