Email - Sending email attachments with the Office 365 Outlook connector
Sending email messages from Power Apps is a common requirement. However, the syntax to compose emails that includes file attachments can be difficult to understand. This post covers serveral examples of how to carry out this task, including:
- How to attach files from a SharePoint record
- How to attach files from a file attachment control
- How to attach an image from the add picture control
- how to attach annotations/signatures from the pen input control
- how to attach audio recordings
- how to attach multiple attachments to an email
This post focuses on how to send these attachment types using the Office 365 Outlook connector. My earlier post bneath provides an introduction to this connector.
Attaching files from a SharePoint record
Let's begin by examining how to attach files from a SharePoint record. We call the SendEmailV2 method to send an email. We can include attachments by passing a table of attachments. The structure of this table must include the column
names "ContentBytes" and "Name". The ContentBytes column contains the
binary content of the attachment, and the Name column specifies the file
name of the attachment.
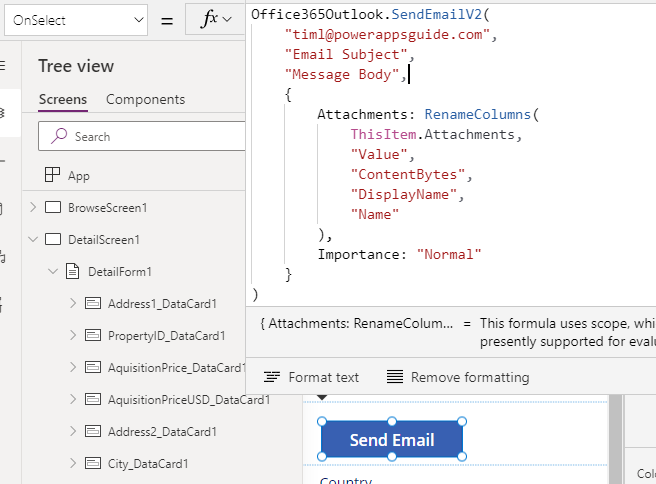
Let's suppose we take a SharePoint record with file attachments. If we add a card to a detail form, the syntax to add the file attachments to an email message looks like this:
Office365Outlook.SendEmailV2(
    "[email protected]",
    "Email Subject",
    "Email Body",
    {
        Attachments: RenameColumns(
            ThisItem.Attachments,
            "Value",
            "ContentBytes",
            "DisplayName",
            "Name"
        ),
        Importance: "Normal"
    }
)
With
a SharePoint record, the Attachments field returns a table of
attachments. This SharePoint table returns the binary content in a field
called "Value", and the attachment name in a field called
"DisplayName".
In the formula above, we
call the RenameColumns function to rename these columns to the
"ContentBytes" and "Name" titles that the SendEmailV2 method expects.
Attaching files that a user selects using a 'file picker'/attachments control
Let's suppose we want to build an email attachment feature that is independent or disconnected from data. A typical requirement is to build a screen that allows a user to choose a file from their local computer using an attachments control, and to attach the selected file(s) to an email.
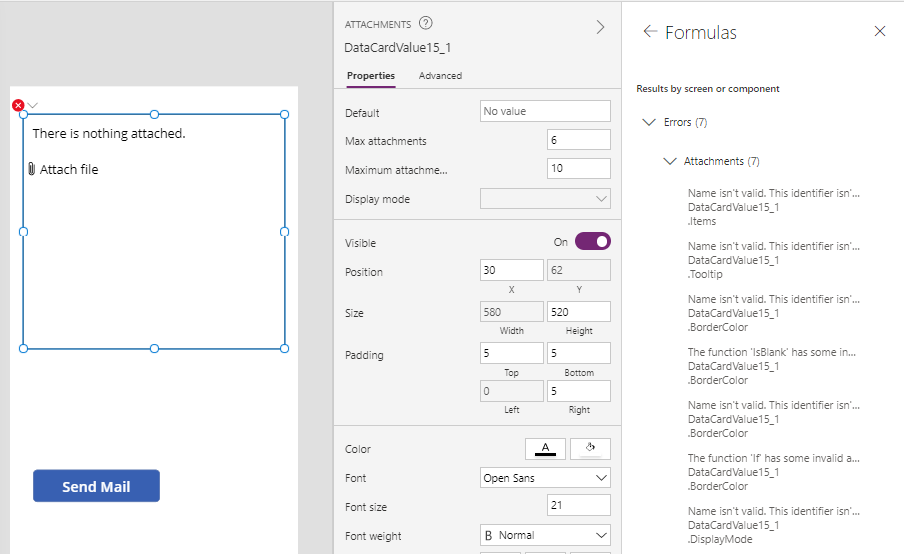
The first challenge is that there's no way to add an attachments control to a screen. The insert menu in Power Apps does not include this control. Therefore, the workaround is to copy an attachments control from a form that we've pre-built, based on a SharePoint or Dataverse record.
When we paste this control onto a new screen, we'll find various errors that relate to references that are no longer valid. We can use the app checker to quickly correct these errors. For each error that exists, we can delete the offending formula to clear the error.
Office365Outlook.SendEmailV2(
    "[email protected]",
    "Email Subject",
    "Email Body",
    {
        Attachments: RenameColumns(
            attFiles.Attachments,
            "Value",
            "ContentBytes"
        ),
        Importance: "Normal"
    }
)
Attaching an image that a user selects using the 'add picture' control
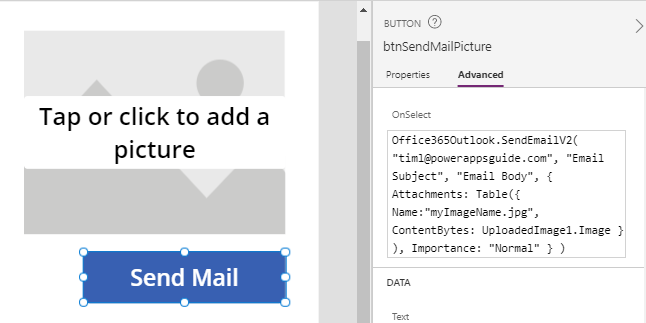
A variation of the previous example is to build a screen that allows a user to choose an image from their local computer using an 'add picture' control, and to attach the selected image to an email.To carry out this task, we add an 'add picture' control to a screen. We can then use the formula beneath to send an email that includes the image that the user selects.
Office365Outlook.SendEmailV2(
    "[email protected]",
    "Email Subject",
    "Email Body",
    {
        Attachments: Table({
            Name:"myImageName.jpg",
            ContentBytes: UploadedImage1.Image
            }
        ),
        Importance: "Normal"
    }
)
The add picture control is a composite control, meaning that it includes a child image control that displays the image that the user uploads. In this case, the name of this control is UploadedImage1. This is the control that we use to retrieve the uploaded image.
Attaching the contents of the 'pen input control' in an email
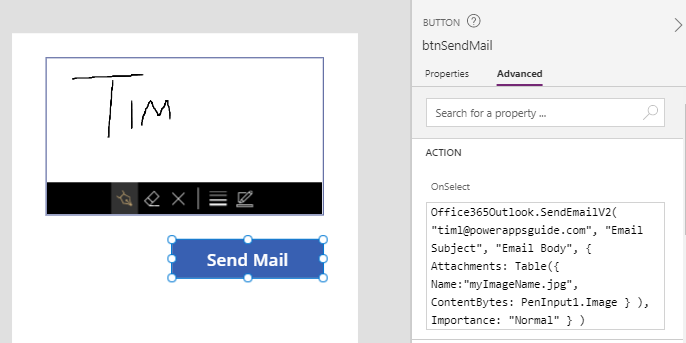
The pen input control allows users to make annotations or to draw images. We can send these annotations as an email image attachment, using a process that's very similar to the 'add picutre' control method.
Once we add a pen input control to a screen, we can use the formula beneath to send an email that includes the annotation.
Office365Outlook.SendEmailV2(
    "[email protected]",
    "Email Subject",
    "Email Body",
    {
        Attachments: Table({
            Name:"myImageName.jpg",
            ContentBytes: PenInput1.Image
            }
        ),
        Importance: "Normal"
    }
)
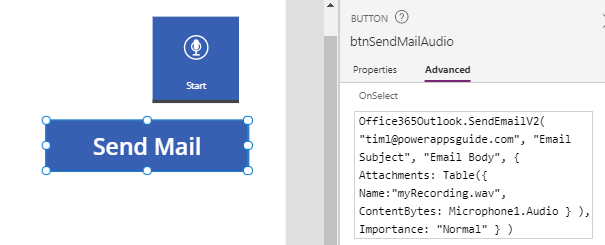
Attaching an audio recording in an email
The microphone control allows users to make audio recordings. My previous post here describes this control, including how to save audio files to a data source.It's possible to attach an audio recording as an email attachment. To do this, we add a microphone control to the screen, and use the formula beneath.
Office365Outlook.SendEmailV2(
    "[email protected]",
    "Email Subject",
    "Email Body",
    {
        Attachments: Table({
            Name:"myRecording.wav",
            ContentBytes: Microphone1.Audio
            }
        ),
        Importance: "Normal"
    }
)
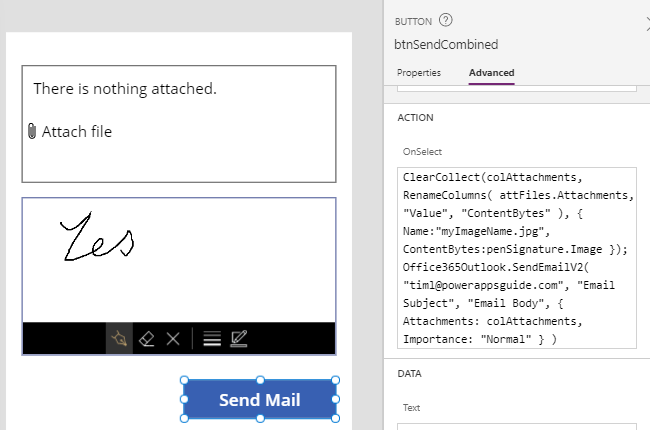
Attaching multiple files in an email
Finally, a frequent requirement is to add multiple attachments from different sources to an email. An easy way to do this is to add the multiple attachments to a collection, and to pass this collection to the SendEmailV2 method. The formula beneath illustrates how to compose an email with files from an attachment control, and the annotation from a pen input control.
ClearCollect(colAttachments,
             RenameColumns(
                    attFiles.Attachments,
                    "Value",
                    "ContentBytes"
             ),
             {
                Name:"myImageName.jpg",
                ContentBytes:penSignature.Image
              }
);
Office365Outlook.SendEmailV2(
    "[email protected]",
    "Email Subject",
    "Email Body",
    {
        Attachments: colAttachments,
        Importance: "Normal"
    }
)
Conclusion
The syntax to compose emails with file attachments can be complex. This post described how to carry out this task, including how to attach files, images, annotations, audio recordings, and combinations of files to an email message.
