Email - How to send email with the Office 365 Outlook connector
The easiest way to add email functionality to an app is to use the "Office 365 Outlook" connector. With this connector, the end user can send messages from within an app using their Office 365 Outlook account.
Although the basic usage of this connector is straightforward, the syntax for more complex tasks isn't completely obvious. Therefore, this post summarises all of these usage scenarios.
Prerequisite steps
To send messages with the Office 365 Outlook connector, the first step is to add the connector to our app through the data panel.
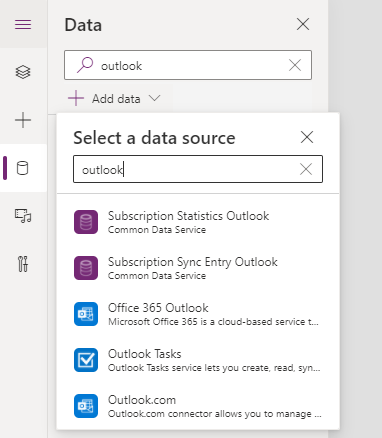
Once we do this, we can reference the Office365Outook connector in formula. This connector provides access to a wide range of Outlook tasks. This include the ability to add and retrieve calendar and contact items, and to access email (the topic of this post).
If we add a button and reference the Office365Outook connector in the OnSelect property of the button, we
see there are two methods - SendEmail and SendEmailV2.
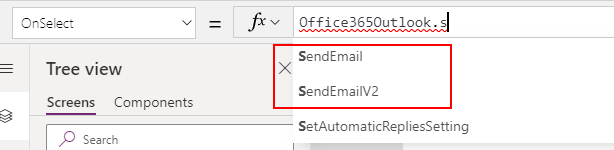
SendEmailV2 method is the most up-to-date and this is the one that we should use.
For reference, the full documention for this connector is here:
1. Sending an email - simple usage
Starting with the most basic usage of the SendEmailV2 method, here's how to send a message to a recipient, and how to specify the message subject and body.
Office365Outlook.SendEmailV2("[email protected]",
                             "Enter the email title here",
                             "Enter your email message here"
)
By far the most common question I see is - how do I add line breaks or carriage returns to a message?
The SendEmailV2 method takes an email body in HTML format. Therefore, to add a line break to the message body, we use the HTML tag that represents a line break, which is <br>. Here's an example of how this looks:
Office365Outlook.SendEmailV2("[email protected]",
                             "Enter the email title here",
                             "Line 1 of the message body <br> Line 2 of the message"
)
2. Sending an email to multiple recipients
What's the syntax to send a message to multiple recipients? Do we pass a table, or do we pass a delimited string?
The answer is - if we want to send a message to multiple recipients, we specify a semicolon delimited string like so.
The answer is - if we want to send a message to multiple recipients, we specify a semicolon delimited string like so.
Office365Outlook.SendEmailV2("[email protected]; [email protected]",
                             "Enter the email title here",
                             "Enter your email message here"
)
3. Adding CC recipients to a message
This is where the syntax starts to get complicated. To specify CC recipients, we pass a record as the fourth argument to the SendEmailV2 method. The field name that we use for this record is "Cc". Note that the capitalisation of this is important - the first C must be uppercase, and the second lower case.
To provide more than a single CC recipient, we separate the email addresses with semicolons.
Office365Outlook.SendEmailV2(
    "[email protected]",
    "Email Subject",
    "Email Body",
    {
        Cc:"[email protected];[email protected]"
    }
)
4. Adding BCC recipients to a message
The syntax to add BCC recipients works in the same way as CC recipients. Here's how to send a message that includes both CC and BCC recipients. Notice how we pass a record with both CC and BCC fields. For the remainder of this article, we can append fields to the record to specify multiple attributes.
Office365Outlook.SendEmailV2(
    "[email protected]",
    "Email Subject",
    "Email Body",
    {
        Cc:"[email protected];[email protected]",
        Bcc:"[email protected]",
    }
)
5. Setting the Reply to address
When a recipient replies to an email, the reply address will be the sender address. We can specify a different reply-to address by setting a ReplyTo value.
Office365Outlook.SendEmailV2(
    "[email protected]",
    "Email Subject",
    "Email Body",
    {
        ReplyTo:"[email protected]"
    }
)
6. Sending on behalf of a another user
To send a message on behalf of someone else, we change the 'From' address of the message like so:
Office365Outlook.SendEmailV2(
    "[email protected]",
    "Email Subject",
    "Email Body",
    {
        From:"[email protected]"
    }
)
7. Setting the importance of a message
To set the importance of message, we provide a string value that represents the importance. There are 3 valid values - "High", "Low", and "Normal".
Office365Outlook.SendEmailV2(
    "[email protected]",
    "Email Subject",
    "Email Body",
    {
        Importance: "Normal"
    }
)
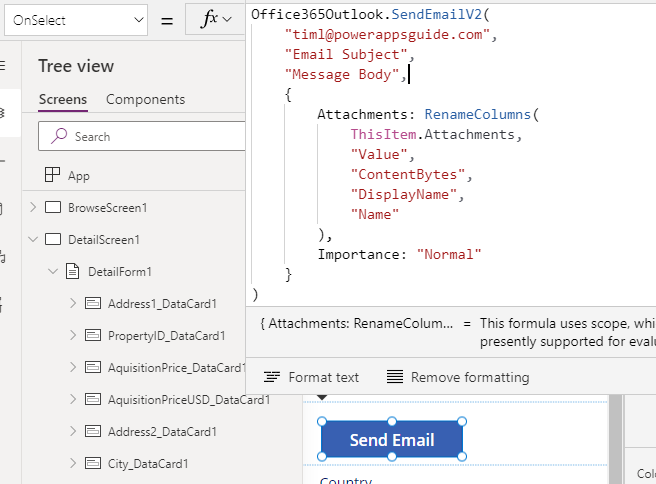
8. Adding attachemnts
Finally, the most complex part is how to include attachments. To add attachments, we specify a table of attachments. The SendEmailV2 method expects to receive a table that contains the column names "ContentBytes" and "Name". The ContentBytes column contains the binary content of the attachment, and the Name column specifies the file name of the attachment.
To demonstrate, let's suppose we take a SharePoint record that has file attachments. If we add a card to a detail form, the syntax that we use to include the file attachments to an email message looks like this:
Office365Outlook.SendEmailV2(
    "[email protected]",
    "Email Subject",
    "Email Body",
    {
        Attachments: RenameColumns(
            ThisItem.Attachments,
            "Value",
            "ContentBytes",
            "DisplayName",
            "Name"
        ),
        Importance: "Normal"
    }
)
With a SharePoint record, the Attachments field returns a table of attachments. This SharePoint table returns the binary content in a field called "Value", and the attachment name in a field called "DisplayName".
In the formula above, we call the RenameColumns function to rename these columns to the "ContentBytes" and "Name" titles that the SendEmailV2 method expects.