Media - How to save and work with microphone recordings
The microphone control offers a useful and valuable feature. However, it isn't clear from the documentation how to save or to access recordings from a data source. In this post, we'll walk through how to store and retrieve audio files in a Dataverse database.
Introducing the microphone control
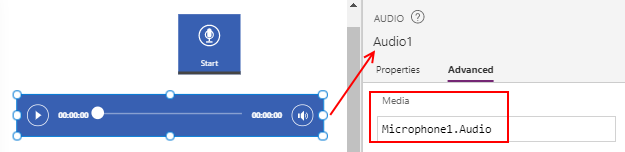
To make recordings, we add a microphone control using the Insert > Media menu item. At runtime, this control displays a button with a microphone icon. The user can click the button to start a recording, and a timer inside the button will show the elapsed time. The user can click the button again to stop the recording.In formula, we can access the recording through the Audio property.
To illustrate the most basic usage, we can add an audio control to a screen and configure it to play the microphone recording by setting the Media property to Microphone1.Audio (where Microphone1 refers to the microphone control).
Saving microphone recordings
Although we can easily access the recording that a user makes, it isn't obvious how to save this recording. The data source with the best support for storing audio files is Dataverse. This is because it offers the option to define columns of data type 'file'.If we choose a different data source such as SharePoint, we can use the JSON function to Base64 encode the audio data, and to store this in a text field. We can reuse the same technique that app builders regularly use to store camera images in SharePoint.
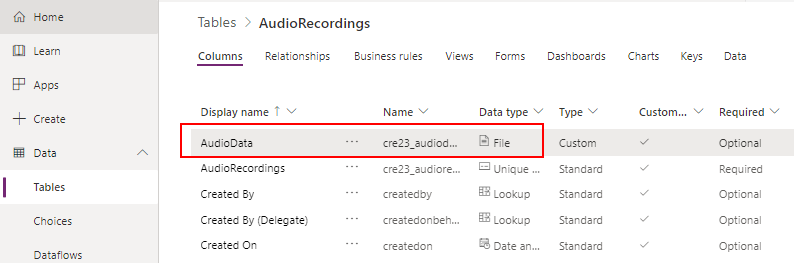
To save our recordings to Dataverse. The first step is to create a table. In this example, we'll name our table AudioRecordings, and we'll add a file column called AudioData.
Patching audio (or file content) to a Dataverse table
From our app, we can add a connection to the table. From our screen, we can add a microphone control and a button that patches the audio content as a new record in the table. This is the formula that we would add to the OnSelect property of the button.Patch(AudioRecordings,
Defaults(AudioRecordings),
{Name:"Record title for row in Dataverse table" ,
AudioData:{FileName:"Filename.wav",
Value:Microphone1.Audio
}
}
)
This formula provides a good illustration of how to patch binary files to a file column in Dataverse. At the time of writing, it isn't obvious how to do this because the IntelliSense does not show the expected properties for the file field.
To specify a file, we pass a record and there are two properties that we need to specify - the file name (FileName) , and the binary content (Value). In this example, we specify the file name "Filename.wav" but in practice, we can create a file name based on the current date and time. We reference the Audio property of the microphone control to specify the microphone recording.
At this point, we can run our app, make a recording, and click the button to save the recording.
Displaying and playing audio files
To provide a method for users to play back recordings, we can add a gallery control and set the Items property to the AudioRecordings table.From the gallery control, we can display the file name by using the syntax: ThisItem.AudioData.FileName
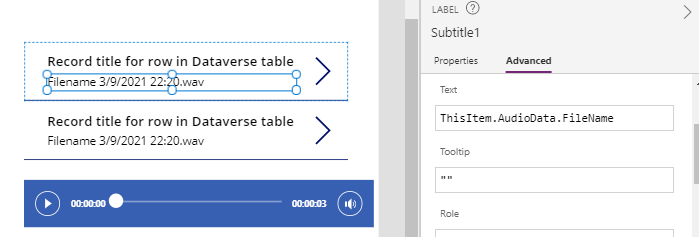
We can then add an audio control, and we can configure this to play the file that the user selects in the gallery control by setting the Media property to:
Gallery1.Selected.AudioData.Value
