Forms - How to show Office 365 user profile details on a form
From time to time, I see questions from app builders that struggle to display user profile details on a canvas app form.
Unfortunately, the ability to carry out this task Is more difficult than it could be, compared to other platforms or systems. To give an example, a Portal App contains a built-in page that displays and enables the user to edit their profile details. This feature is entirely built-in, and there are no additional to carry out.
Displaying details of a specific user in a form (by email address)
Unfortunately, the ability to carry out this task Is more difficult than it could be, compared to other platforms or systems. To give an example, a Portal App contains a built-in page that displays and enables the user to edit their profile details. This feature is entirely built-in, and there are no additional to carry out.
The equivalent task in a canvas app is more complex and in this post,we'll walk through how to use a display form control to display the details of the current user, or a specific user.
Displaying details of the current user in a form control
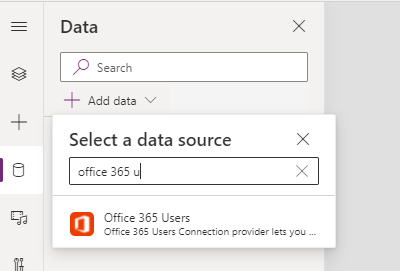
To display the Microsoft/Office 365 profile of the details of the logged in user, the first step is to add the "Office 365 Users" data source to an app.
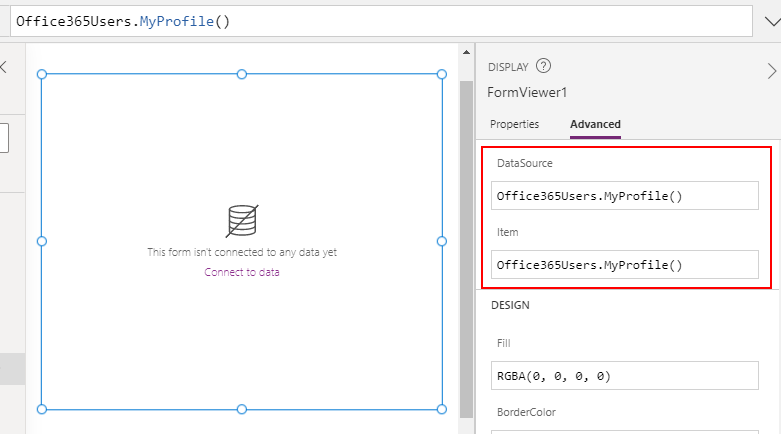
The typical way to configure a form is to set the DataSource and Item properties. To display the current user, we can set both of these properties to the following formula:
Office365Users.MyProfile()
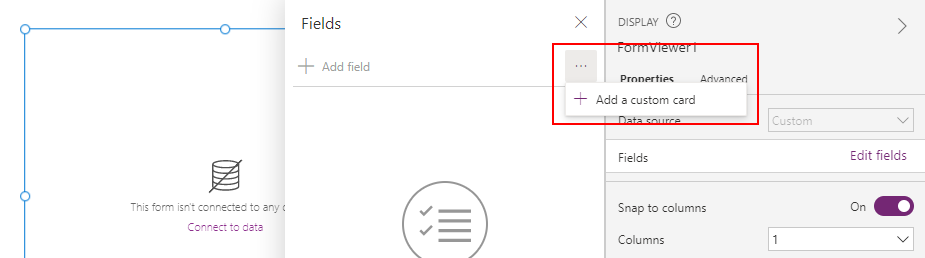
When we bind a form to a non-connected data source, the 'Edit fields' > 'Add field' button does not show a list of available fields. Therefore, it's necessary to add a custom card.
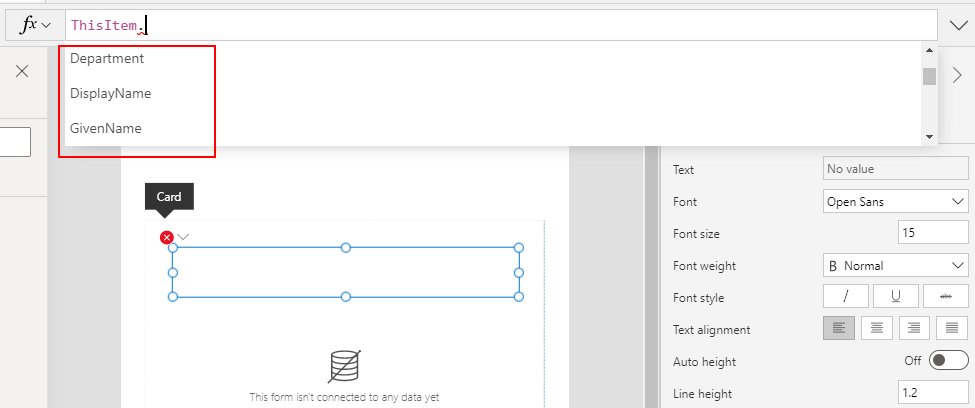
From within the custom card, we can add label controls, and we can set the text property of the label to display the available fields from the user profile. For example, we can type ThisItem.GivenName to display the first name of the user.
The available field names include:.
ThisItem.City
ThisItem.CompanyName
ThisItem.Country
ThisItem.Department
ThisItem.DisplayName
ThisItem.GivenName
ThisItem.Id
ThisItem.JobTitle
ThisItem.Mail
ThisItem.MailNickname
ThisItem.mobilePhone
ThisItem.OfficeLocation
ThisItem.PostalCode
ThisItem.Surname
ThisItem.TelephoneNumber
ThisItem.UserPrincipalName
ThisItem.AccountEnabled
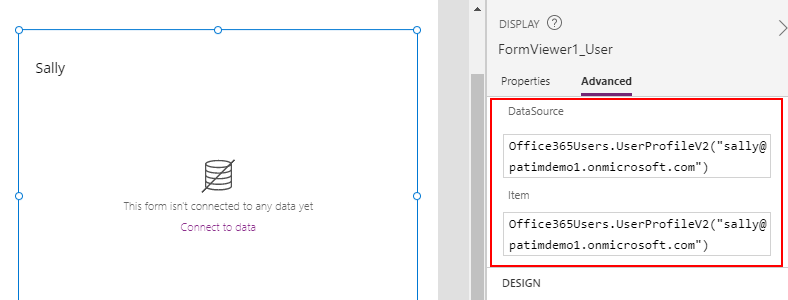
Displaying details of a specific user in a form (by email address)
To display the details of a specific user, we set the DataSource
and Item properties the result of the UserProfileV2 method. We pass the target address of the user to this method.
Office365Users.UserProfileV2("[email protected]")
The screenshot beneath shows the application of this technique with a hardcoded email address. We could alternatively supply an email address through a variable, or though a control such as a text input control, drop down control, or gallery.
Using the same technique as before, we can add a label to a custom card, and use the ThisItem keyword to access the following fields:
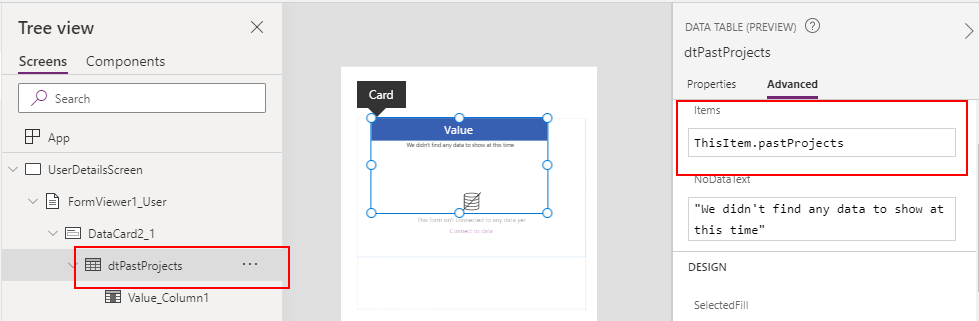
aboutMe, accountEnabled, birthday, businessPhones, city, companyName, country,
department, displayName, givenName, hireDate, id, interests, jobTitle, mail,
mailNickname, mobilePhone, mySite, officeLocation, pastProjects, postalCode,
preferredLanguage, preferredName, responsibilities, schools, skills, state,
streetAddress, surname, userPrincipalName, userType
Note that some of these fields will be table values (businessPhones, interests, pastProjects, responsibilities, schools, skills). To display these values, we can add a child gallery or Datatable control to the custom card. We can then set the Items property of the child control to the field value (eg, ThisItem.pastProjects)
Conclusion
To display the details of a user on a form, we set the DataSource and Item properties of a form to a call to the Office 365 Users connector. We can call the MyProfile method to retrieve the details of the current user, or the UserProfileV2 to retrieve the details of a specific user by email address. From within the form, we add a custom card, and add child labels to display specific fields from the user profile.
