Blog
SharePoint - How to Patch the 6 most complex data types
January 16. 2021
Patch is the number one function that all app builders should understand well. We call this function to add or to update records to a data source.
The documentation here provides good code
samples.
It's easy to patch simple text and numeric values. For more complex data types however, the Patch syntax looks complex and obscure because it requires a reference to the odata type of the column that we want to patch. This can cause much confusion and in this post, I'll summarise the 6 most complex use case scenarios.This includes the syntax to patch lookup, single choice, multi-choice, yes/no, single person/group, and multi person/group columns.
Demonstration SharePoint list
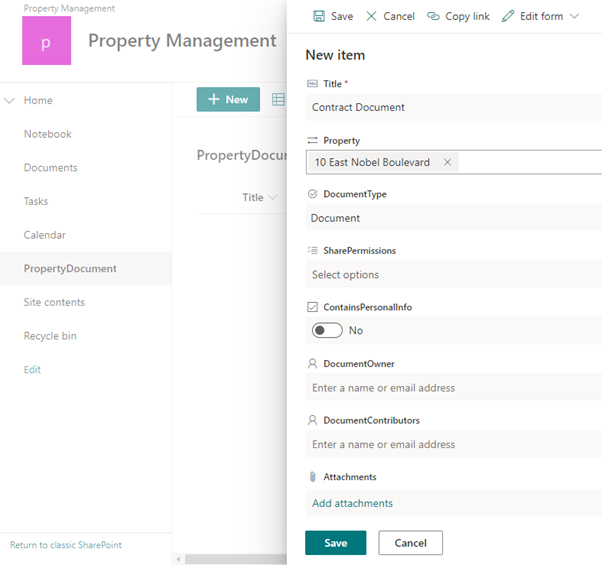
To demonstrate, we'll use the example SharePoint list shown here.

The 'Property Document' list stores property document details and besides the text title field, there are 6 complex columns. These are:
| Column name | Data type | Description |
| Property | Lookup | A lookup to the property list |
| DocumentType | Choice (Dropdown) | Single selection choice list with the following options - Document, Image, PDF,Audio |
| SharePermissions | Choice (Checkbox - multi-selection) | Multi-selection choice list with the following options - Can Share On Website Can Share With Customer Can Share Internally Can Share With Team |
| ContainsPersonalInfo | Yes/No | A boolean yes/no field |
| DocumentOwner | Person or Group | Allows a single selection of a person or group |
| DocumentContributors | Person or Group | Allows multiple selections of persons or groups |
Let's now find out the Patch syntax to add new records into this list.
1 . Lookup Column
To patch a lookup column, we refer to the related item by ID value. Here's the syntax to create a new record and to set the property lookup value to the property record that matches ID 8.
Patch(PropertyDocument,
      Defaults(PropertyDocument),
      {
          Title:"Document Title",
          Property:{
                     '@odata.type':"#Microsoft.Azure.Connectors.SharePoint.SPListExpandedReference",
                     Id:8,
                     Value:""
                   }
      }
)
To specify a lookup record by the title or some
other related column, we can incorporate the use of the Lookup function. Here's the syntax to create a new record and to set the property lookup value to the first property record with an Address1 value that matches “10 High
Street”.
Patch(PropertyDocument,
      Defaults(PropertyDocument),
      {
          Title:"Document Title",
          Property:{
                     '@odata.type':"#Microsoft.Azure.Connectors.SharePoint.SPListExpandedReference",
                     Id:LookUp(Property, Address1="10 High Street").Id,
                     Value:""
                   }
      }
)
If we were creating or updating a record and want to set a lookup value to blank, we can do this by setting the Id value to -1.
Patch(PropertyDocument,
      Defaults(PropertyDocument),
      {
          Title:"Document Title",
          Property:{
                     '@odata.type':"#Microsoft.Azure.Connectors.SharePoint.SPListExpandedReference",
                     Id:-1,
                     Value:""
                   }
      }
)
2 . Choice column (single selection)
A SharePoint choice column enables the user to set the field value to one of a set of predefined values. The syntax to create a new record and to set the document field to “PDF” is as follows:
Patch(PropertyDocument,
      Defaults(PropertyDocument),
      {
          Title:"Document Title",
          DocumentType:{
                     '@odata.type':"#Microsoft.Azure.Connectors.SharePoint.SPListExpandedReference",
                      Value:"PDF"
                   }
      }
)
3 . Choice column (select many)
With a SharePoint Choice (Dropdown) field, users can assign multiple values to a field. To pass multiple values to the Patch function, we assign a table of choice selections to the field. The syntax to create a new record and to set the SharePermissions value to "Can Share On Website" and "Can Share With Customer" looks like this.
Patch(PropertyDocument,
      Defaults(PropertyDocument),
      {
          Title:"Document Title",
          SharePermissions:
             Table(
                     {
                       '@odata.type':"#Microsoft.Azure.Connectors.SharePoint.SPListExpandedReference",
                        Value:"Can Share On Website"
                     },
                     {
                       '@odata.type':"#Microsoft.Azure.Connectors.SharePoint.SPListExpandedReference",
                        Value:"Can Share With Customer"
                     }
               )
      }
)
4 . Yes/No column
With SharePoint yes/no fields, we can simply pass a boolean true or false value. Here's the syntax to create a new record and to set the ContainsPersonalInfo field to “yes”.
Patch(PropertyDocument,
      Defaults(PropertyDocument),
      {
          Title:"Document Title",
          ContainsPersonalInfo: true
      }
)
5 . Person column (single person)
Typically, we assign the value of a person field by email address. In SharePoint, the email address provides a unique identifier for a person field. The
syntax to create a new record and to set the DocumentOwner value to
"[email protected]" looks like this:
Patch(PropertyDocument,
      Defaults(PropertyDocument),
      {
          Title:"Document Title",
          DocumentOwner:{
                        '@odata.type':"#Microsoft.Azure.Connectors.SharePoint.SPListExpandedUser",
                        Claims:"i:0#.f|membership|[email protected]",
                        Email:"",
                        Department:"",
                        DisplayName:"",
                        JobTitle:"",
                        Picture:""
                   }
      }
)
To assign a person with Patch, we must pass an object that includes attributes that include Email, Department, DisplayName, JobTitle, and Picture. If we omit these attributes, the designer shows an error. Therefore, we overcome this error by buiding an object that contains empty values for these required attributes. Note that the attribute values we specify here will not update the user or overwrite the values that are stored against the Office365 profile for the user.
6 . Person column (multiple person)
To patch multiple people to a person column, we pass a table of people where each person is identified by email address. The
syntax to create a new record and to set the DocumentContributor values to
"[email protected]" and
"[email protected]" looks like this:
Patch(PropertyDocument,
      Defaults(PropertyDocument),
      {
          Title:"Document Title",
          DocumentContributors:
             Table(
                   {
                      '@odata.type':"#Microsoft.Azure.Connectors.SharePoint.SPListExpandedUser",
                      Claims:"i:0#.f|membership|[email protected]",
                      Email:"",
                      Department:"",
                      DisplayName:"",
                      JobTitle:"",
                      Picture:""
                   },
                   {
                      '@odata.type':"#Microsoft.Azure.Connectors.SharePoint.SPListExpandedUser",
                      Claims:"i:0#.f|membership|[email protected]",
                      Email:"",
                      Department:"",
                      DisplayName:"",
                      JobTitle:"",
                      Picture:""
                   }
               )
      }
)
Conclusion
Related posts
- Apps - Migrating OnStart formula to use App.StartScreen/ Fixing existing apps that implement deep linking
- Calculations - What mistakes can happen when we fail to use round brackets correctly in calculations?
- Walkthrough - Solving maths puzzles with Power Apps
- Formulas - Review of how to write formulas using natural language
- Formula - converting centimeters/meters to feet and inches, and vice versa
- Dates - 4 tips to make sure that dates display correctly in UK "dd mm yyyy" format
- Formulas - How to calculate the distance between 2 points
- Formulas - Generating Row Numbers - Part 2
- Data - How to access nested collections/tables
- Formulas - Show Running Totals
- Formulas - Generating Row Numbers
