Email - How to send mail with the Gmail connector
In cases where we want to send emails from Power Apps through a Gmail account, we can carry out this task with the help of the Gmail connector. This post describes how to send messages with this connector.
1. Sending an email - simple usage
3. Adding CC recipients to a message
To provide more than a single CC recipient, we separate the email addresses with semicolons.
4. Adding BCC recipients to a message
5. Setting the importance of a message
6. Adding attachemnts
To demonstrate, let's suppose we take a SharePoint record that has file attachments. If we add a card to a detail form, the syntax that we use to include the file attachments to an email message looks like this:
In this post, we covered how to send messages with the Gmail Connector. This included how to send messages to multiple recipients, how to add BCC and CC recipients to a message, and how to add attachments.
Prerequisite steps
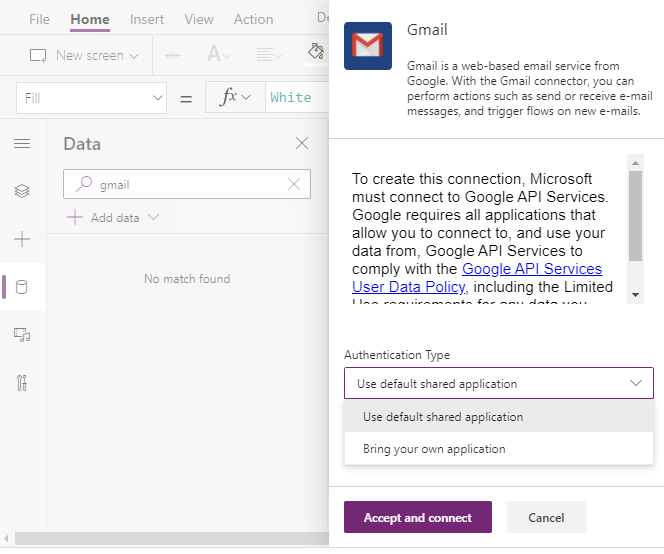
To send messages with the Gmail connector, the first step is to add the Gmail connector to our app through the data panel.
The Gmail connector provides two authentication types.
- 'Use default shared application'
- 'Bring your own application'
With the "use default shared application" choice, the app will prompt us to sign into the Gmail account when it starts. At this point, we'll be prompted to consent to the Microsoft Power Platform application, like most other connectors.
The "Bring your own application" option requires us to configure our own Google OAuth Client application. This provides more control over permissions another properties of the connector. It requires more work to set up, and the documentation for the connector provides more details.
Once we add the Gmail connector, we can reference it in formula. This
connector provides access to a wide range of Gmail tasks, including the
ability to send, reply, retrieve, and to delete messages.
1. Sending an email - simple usage
The SendEmailV2 method is the latest method that we should use to send messages. Starting with the most basic usage, here's how to send a message to a recipient, and how to specify the message subject and body. The syntax is slightly complex because we need to construct a record that contains the email subject and body.
Gmail.SendEmailV2("[email protected]",
                  {
                     Subject:"Enter the email title here",
                     Body:"Enter your email message here"
                  }
)
A common question is - how do I add line breaks or carriage returns to a message? The SendEmailV2 method takes an email body in HTML format. Therefore, to add a line break to the message body, we use the HTML tag that represents a line break, which is <br>. Here's an example of how this looks:
2. Sending an email to multiple recipients
Gmail.SendEmailV2("[email protected]",
                  {
                     Subject:"Enter the email title here",
                     Body: "Line 1 of the message body <br> Line 2 of the message"
                   }
)
2. Sending an email to multiple recipients
What's the syntax to send a message to multiple recipients? Do we pass a table, or do we pass a delimited string? The answer is - if we want to send a message to multiple recipients, we specify a semicolon delimited string like so.
Gmail.SendEmailV2("[email protected]; [email protected]",
                  {
                     Subject:"Enter the email title here",
                     Body:"Enter your email message here"
                  }
)
3. Adding CC recipients to a message
To specify CC recipients, we include CC values in the record that we pass to the SendEmailV2 method. The field name that we use for this record is "Cc". Note that the capitalisation of this is important - the first C must be uppercase, and the second lower case.
To provide more than a single CC recipient, we separate the email addresses with semicolons.
Gmail.SendEmailV2("[email protected]",
                  {
                     Subject:"Enter the email title here",
                     Body:"Enter your email message here",
                     Cc:"[email protected];[email protected]"
                  }
)
4. Adding BCC recipients to a message
The syntax to add BCC recipients works in the same way as CC recipients. Here's how to send a message that includes both CC and BCC recipients.
Gmail.SendEmailV2("[email protected]",
                  {
                     Subject:"Enter the email title here",
                     Body:"Enter your email message here",
                     Cc:"[email protected];[email protected]",
                     Bcc:"[email protected]"
                  }
)
5. Setting the importance of a message
To set the importance of message, we provide a string value that represents the importance. There are 3 valid values - "High", "Low", and "Normal".
Gmail.SendEmailV2("[email protected]",
                  {
                     Subject:"Enter the email title here",
                     Body:"Enter your email message here",
                     Importance: "Normal"
                  }
)
6. Adding attachemnts
Finally, the most complex part is how to include attachments. To add attachments, we specify a table of attachments. The SendEmailV2 method expects to receive a table that contains the column names "ContentBytes" and "Name". The ContentBytes column contains the binary content of the attachment, and the Name column specifies the file name of the attachment.
To demonstrate, let's suppose we take a SharePoint record that has file attachments. If we add a card to a detail form, the syntax that we use to include the file attachments to an email message looks like this:
Gmail.SendEmailV2(
    "[email protected]",
    {
        Subject: "Enter the email title here",
        Body: "Email Body",
        Attachments: AddColumns(
            RenameColumns(
                ThisItem.Attachments,
                "Value",
                "ContentBytes",
                "DisplayName",
                "Name"
            ),
            "ContentType",
            "application/octet-stream"
        )
    }
)
With a SharePoint record, the Attachments field returns a table of attachments. This SharePoint table returns the binary content in a field called "Value", and the attachment name in a field called "DisplayName".
In the formula above, we call the RenameColumns function to rename these columns to the "ContentBytes" and "Name" titles that the SendEmailV2 method expects.
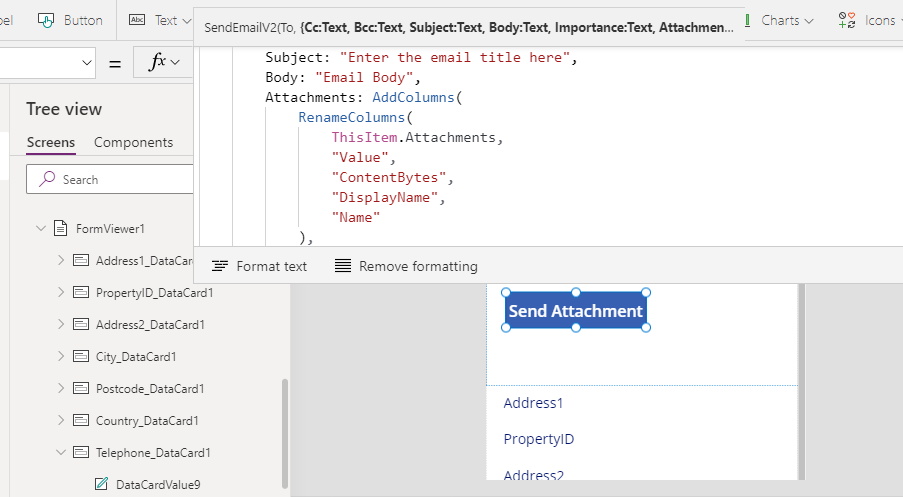
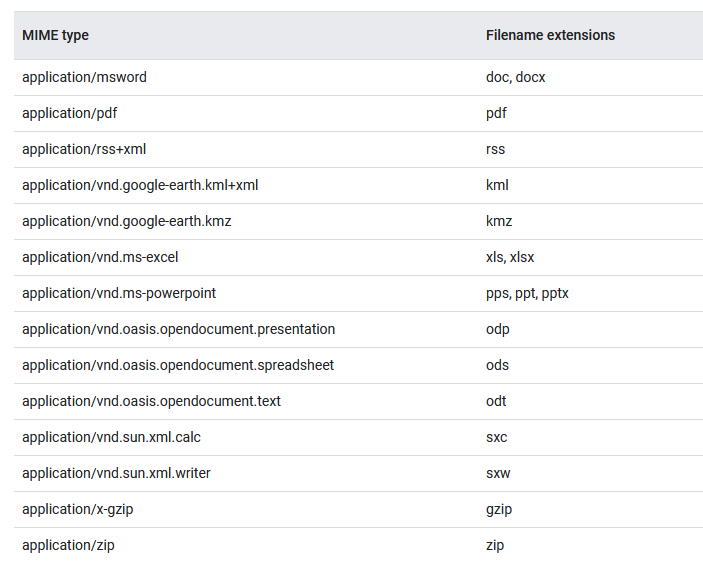
For each attachment that we send, we must specify the ContentType. Ideally, we set this to the content type that corresponds to the attachment (eg, "application/msword" for a Microsoft Word document). In this example, we specify a generic "application/octet-stream" MIME type.
The link beneath highlights a list of valid MIME types that we can use.
https://cloud.google.com/appengine/docs/standard/php/mail/mail-with-headers-attachments
The link beneath highlights a list of valid MIME types that we can use.
https://cloud.google.com/appengine/docs/standard/php/mail/mail-with-headers-attachments
