How to use formulas to perform calculations in Excel and to display the results in Power Apps
App builders sometimes want to use Excel to carry out calculations and return the results to Power Apps. This is particularly the case when we want to migrate existing logic in spreadsheets to Power Apps, or cases where we want to use Excel to call functions that are unavailable in Power Apps. An example is the Workdays function, as I described here.
One way to carry out this task is to use a combination of a Power Automate Flow and Office Script.
For those who are unfamiliar with Office Script, this is a feature that operates just like Excel macros but they apply to Excel files that are stored in SharePoint or OneDrive for Business. We create Office Script with the Typescript language (rather than VBA). Just like normal Excel macros, there is an Office Script recorder that simplifies the creation of scripts by recording screen actions. The documentation for Office Script is here:
Overview of how to return calculated values from Excel to Power Apps
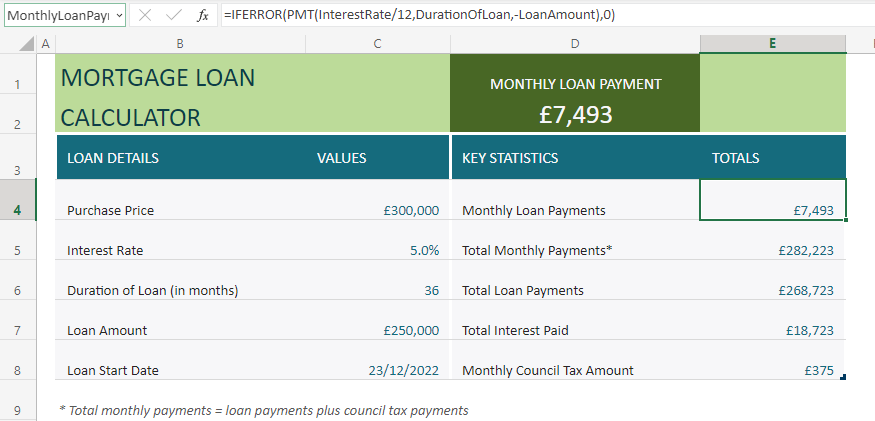
To demonstrate the process, we'll take the demo mortgage loan calculator spreadsheet from the Microsoft Office templates website:
This spreadsheet enables users to enter input values in cells C4 to C8. These input values include the purchase price, interest rate, loan duration, and loan start date. Based on these input values, the spreadsheet calculates key statistics including the monthly loan payment value which is shown in cell D2. It also builds an amortisation table which is visible on a separate sheet.
This spreadsheet provides a good example of calculations that can be challenging to replicate in Power Apps.
The high-level overview of the process is to create an Office Script that sets the input values in the spreadsheet. This script returns the cell value that contains the monthly loan payment amount. We then build a Power Automate flow to call this Office Script, and we can then call this flow from Power Apps.
Creating an Office Script to set Excel spreadsheet values
The first step is to save the spreadsheet to SharePoint or OneDrive for Business. We open the spreadsheet in the browser and create a new office script by going to the Automate menu and clicking "New Script". 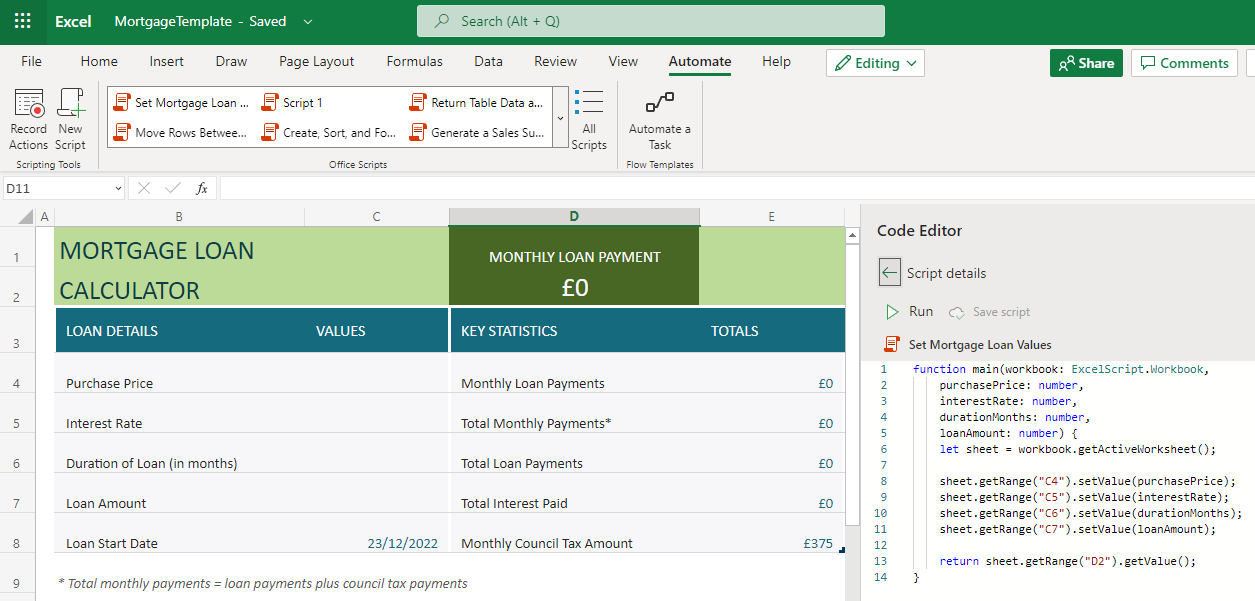
We'll name this script "Set Mortgage Loan Value" and the content of the script is shown below.
function main(workbook: ExcelScript.Workbook,
    purchasePrice: number,
    interestRate: number,
    durationMonths: number,
    loanAmount: number)
{
    let sheet = workbook.getActiveWorksheet();

    sheet.getRange("C4").setValue(purchasePrice);
    sheet.getRange("C5").setValue(interestRate);
    sheet.getRange("C6").setValue(durationMonths);
    sheet.getRange("C7").setValue(loanAmount);

    return sheet.getRange("D2").getValue();
}
The signature of the main function always includes a workbook parameter. We include additional input parameters of data type 'number' that corresponds to each spreadsheet cell that we want to set.
The main part of the script sets the cell values C4 to C7 and at the end of the script, we return the value of the cell D2. This is the cell that contains the calculation for the monthly loan payment value.
The main part of the script sets the cell values C4 to C7 and at the end of the script, we return the value of the cell D2. This is the cell that contains the calculation for the monthly loan payment value.
Creating a Power Automate flow to call the Office Script
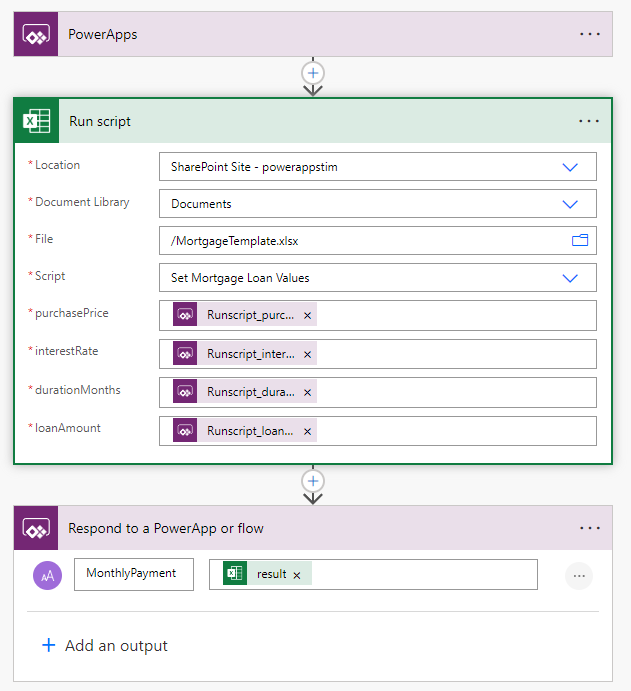
To call an office script, we use a Power automate flow. We create a new 'instant cloud' flow with the Power Apps trigger and use the Excel online business connector to connect to the spreadsheet. We select the 'Run script' action and enter the location, document library name, and file name.We use the script dropdown to select the office script. This populates the action with the parameter names and we set each parameter to the dynamic content - "Ask in PowerApps".
At the end of the flow, we add a "Respond to a PowerApp or flow" action to return the result of the "Run script" action to Power Apps. Note that we choose the option to return the 'MonthlyPayment' result as a string rather than a number. The reason for this is to overcome a bug where Power Apps can fail to recognise Excel numbers that contain excessive number of decimal places.
The screenshot of the entire flow is shown here.
Calling the Power Automate flow from Power Apps
From Power Apps, we can now connect to this flow and set the necessary values. The screenshot beneath illustrates how this looks. This screen includes text input controls for each of the input values.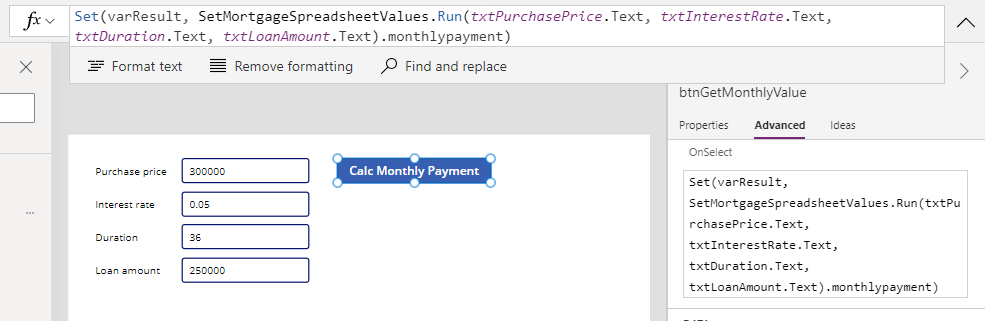
The OnSelect property of the "calculate monthly payment" button looks like this:
Set(varResult,
    SetMortgageSpreadsheetValues.Run(
          txtPurchasePrice.Text,
          txtInterestRate.Text,
          txtDuration.Text,
          txtLoanAmount.Text
    ).monthlypayment
)
The formula sets the return value of the flow to a variable called varResult. We can then display the result of varResult in a label and the screenshot below highlights how this looks with additional formatting.
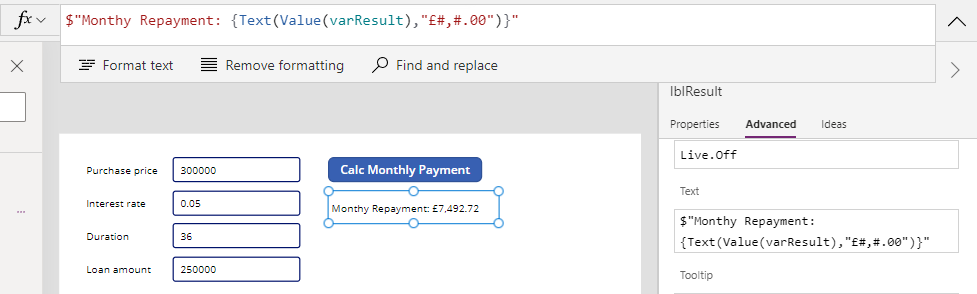
Finally, we can open the spreadsheet and verify that the values have been set correctly and that the output value in Excel (£7,493 rounded) matches the value that we see in Power Apps (£7,492.72).