Intro - How to build Canvas Apps with code
Earlier this month saw the introduction of an exciting new feature - the ability to build canvas apps from code, using text editors or IDEs of our choice, such as Visual Studio Code.
Although this is still very much a preview feature, it provides a significant paradigm shift in the way that we can build canvas apps, and will eventually lead to significant improvements in the app building process, particularly for more advanced users.
At present, there is no executable copy of PASopa that we can download. There is a Github project with the C# .NET source code for PASopa, and we can download the source code and compile the utility for ourselves.
https://github.com/microsoft/PowerApps-Language-Tooling/blob/master/README.md#setting-up-a-dev-box
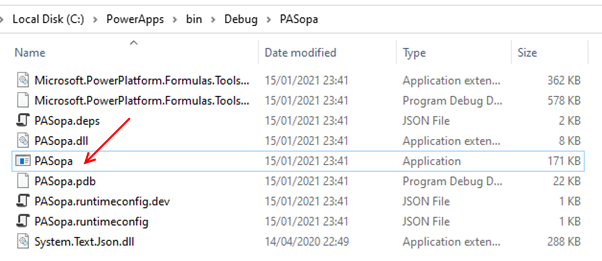
Once the build process completes, we’ll find our compiled files in the \bin\debug\PASopa directory. We can now move the contents of this folder to a more permanent location on our computer.
Overview of the App Building Steps
Now that we've compiled the utility, let's walk through the steps to add a new screen with code. Here's an overview of the steps that we'll follow:
From a command line, we can then call the PASopa utility to unpack the msapp file and to produce a set of source code files. This usage of the utility looks like this:
Opening the source code project in Visual Studio Code
Although this is still very much a preview feature, it provides a significant paradigm shift in the way that we can build canvas apps, and will eventually lead to significant improvements in the app building process, particularly for more advanced users.
In this post, I'll describe this feature in more detail and cover the following points:
- Why I think this feature is so important, and the challenges it will solve
- How to install the necessary tooling
- How to create a set of project files and how to open and edit an app from Visual Studio Code
To provoide a very simple example, we’ll walk through how to construct an app from Visual Studio Code. We'll add a simple screen that emits ‘hello world’ from a button.
What are the current problems? What will this address?
What are the current problems and why do we need a new way to build apps? The answer is that the web-based designer that Power Apps studio offers can be very restrictive, especially for more traditional developers who are used to working with more powerful IDEs (integrated design environments), or for advanced app builders who want to do more.
Some of the challenges that app builders often face include:
- Multiple app builders can’t work on the same canvas app at the same time.
- There's no way to add modifications and changes to a source control system.
- There's no way to report, summarise, or to print the formulas in an app. This is particularly relevant for development teams that want carry out code reviews, or to document an app.
- The designer currently provides no way to search for objects throughout an app, or to carry out global find and replacements on search terms.
What other benefits can this bring?
Building apps from source code can also offer many other advantages.
- There's the potential for efficiency gains because advanced app builders can work more precisely and effectively by directly modifying source code, compared to more slowly clicking around a web based designer.
- We'll be able to build apps offline, without needing a constant online connection to Power Apps. This can enable us to continue working during times when there are outages with the Power Apps service.
- We can take advantage of the rich capabilities of mature IDEs such as Visual Studio, and there is scope for us to work more effectively by using tooling such as custom extensions and macros.
What is the status of this feature (Jan 2021)?
Currently, this is still very much an experimental feature. This initial phase introduces the key utility, the "Power Apps Source File Pack and Unpack Utility" - which we will refer to here as PASopa. The PASopa utility can carry out two tasks:
- It can unpack, or extract an existing app into its constituents source files.
- More importantly, it can repackage source files into a runnable, Power Apps msapp file.
The plan is that eventually, the PASopa utility will be incorporated into the Power Apps CLI (command line utility). This is the suite of command line tools that enable us to carry out tasks such as building PCF components.
At present, there is no executable copy of PASopa that we can download. There is a Github project with the C# .NET source code for PASopa, and we can download the source code and compile the utility for ourselves.
What language do we use to write canvas apps?
One of the most important questions is, what language do we use to build a canvas app?
A canvas app project consists of many file types, including JSON files and other resource files. Primarily, we'll be building functionality in screens and the language that we use to do this is a subset of YAML (YAML Ain’t Markup Language).
A canvas app project consists of many file types, including JSON files and other resource files. Primarily, we'll be building functionality in screens and the language that we use to do this is a subset of YAML (YAML Ain’t Markup Language).
The documentation for this language is here:
https://github.com/microsoft/PowerApps-Language-Tooling/blob/master/docs/YAMLFileFormat.md
https://github.com/microsoft/PowerApps-Language-Tooling/blob/master/docs/YAMLFileFormat.md
From within the YAML, we can embed the Power Apps formulas that we're already familiar with.
How to download and compile the PASopa utility
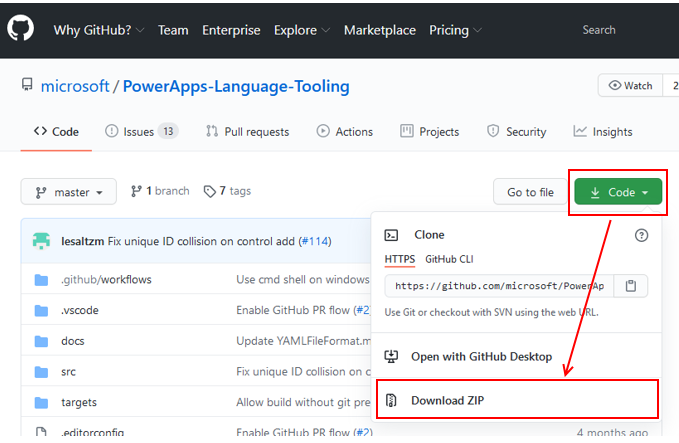
We can download the source code for the PASopa utility from the following Github page.https://github.com/microsoft/PowerApps-Language-Tooling/blob/master/README.md#setting-up-a-dev-box
The link to download the source code appears beneath the green 'Code' button. From here, we'll find a "Download ZIP" menu item.
To compile the utility, we need to download the .NET Core Runtime 3.1.11 from the link beneath. The console version that is labelled "The .NET Core Runtime contains just the components needed to run a console app." is the one we need.
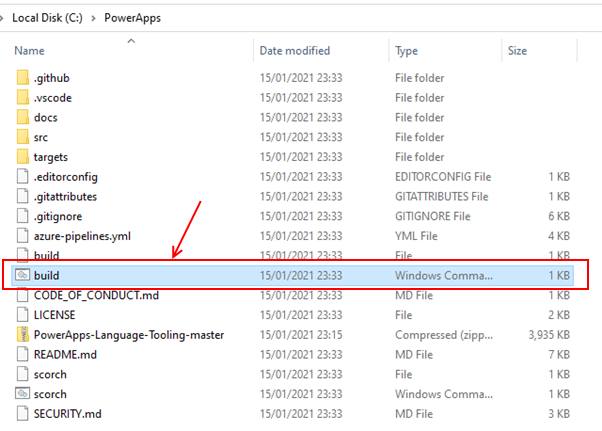
The next step is to unzip the source code. Here, we'll find a batch file called Build. To build the PASopa utility, we open a Windows command prompt and run the Build.bat file.
Overview of the App Building Steps
- We'll create a source code project by extracting the source code from an existing app
- We'll create a new screen with YAML
- Finally, we'll repackage, open, and run our app from Power Apps Studio
Creating a Source Code Project
To create a set of source code files to work from, we can extract the source code form an existing app that we've built in Power Apps Studio.
To demonstrate, we’ll use Power Apps studio to create a
app that connects to a SQL Server table. We'll use the File > 'Save As' option to save the msapp file onto our local machine.
pasopa -unpack FromApp.msapp ToSourceFolder
For this example, we'll use the following locations:
- Location of PASopa utility: C:\PowerApps\Utils\PASopa
- Source msapp file: C:\PowerApps\MSAppFiles\IssueAppSQL.msapp
- Target output folder: C:\PowerApps\ProjectFiles\IssueAppSQL
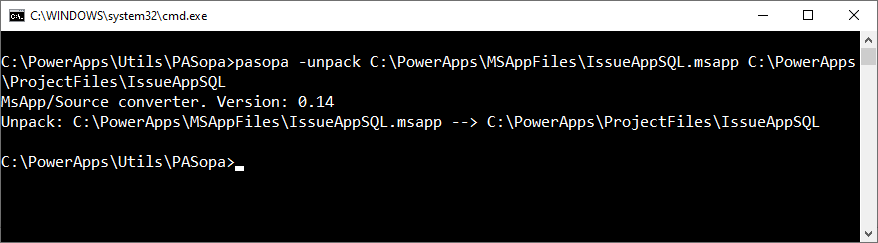
With these locations, the command to unpack the source files looks like this:
pasopa -unpack C:\PowerApps\MSAppFiles\IssueAppSQL.msapp
        C:\PowerApps\ProjectFiles\IssueAppSQL
The command should hopefully unpack the source code into the target folder without any errors.
Many app builders are aware that an msapp is a compressed zip file that contains app resources. Note that renaming an msapp file to ZIP and uncompressing it is not the same as unpacking an msapp file. The unpack process extracts the contents of the msapp file into a supported structure that we can repack.
Opening the source code project in Visual Studio Code
Once we unpack the source code, we can open the project folder from Visual Studio Code, or an IDE of our choice. We could even use a simple text editor like notepad if we wanted to.
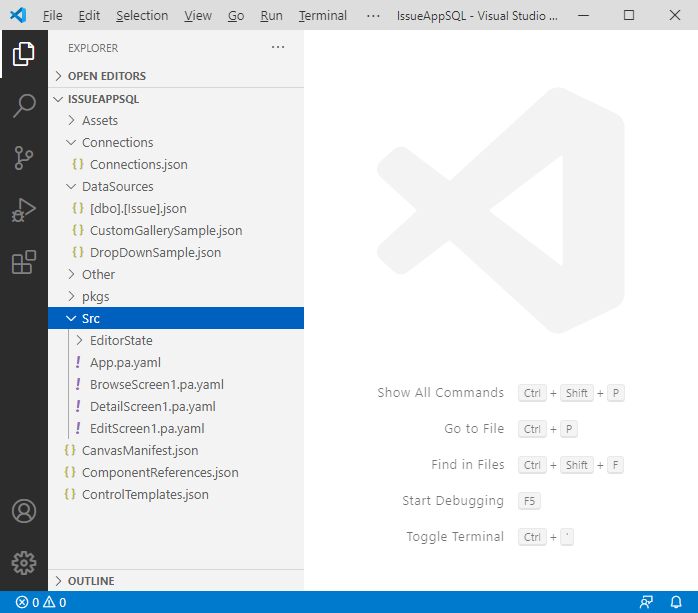
The screenshot beneath shows how our project looks like in Visual Studio Code.
The structure of the project is intuitive and consists of the main folders:
- Connections - App connections are defined in this folder
- DataSources - the data sources in an app are stored
- Src - this folder contains the YAML source code for our screens
Other key folders of interest include:
- Assets - This folder contains image and media files
- pkgs - This folder contains external references such as API definition files and PCF component files
Walkthrough – Adding and Building a new screen in Visual Studio
To demonstrate how to build and customise an app with code, we'll walk through the process to add a screen. Our screen will contain a button that sets the value of a variable to "hello world". We'll then add a label and set the text property to value of this variable.
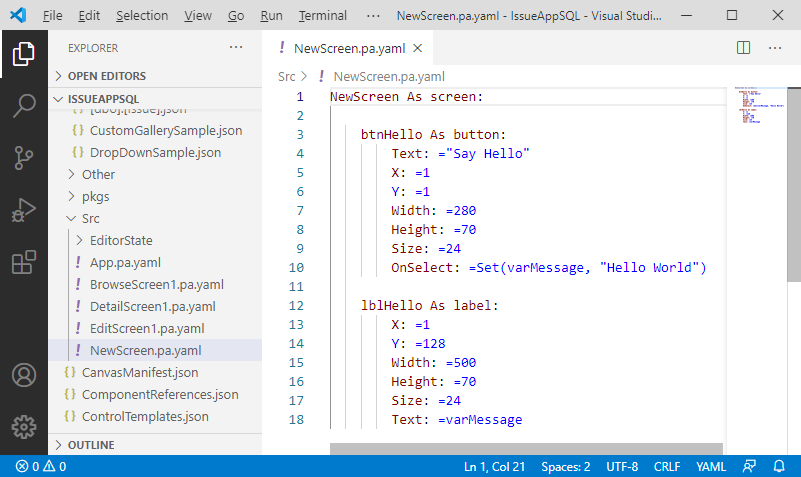
To create a screen called NewScreen, we create a file called NewScreen.pa.yaml in the Src folder. We can use the right click "New File" menu item in Visual Studio Code to create this file.
We can now write the YAML code to define the controls on our screen.The screenshot beneath shows the code that defines the button and label.
The first line defines the screen definition and screen name. In the body of the yaml file, we define our objects (a button and label).
We define the properties of the object (such as the text property, X,Y and size properties) beneath the definition of the object. The indentation of the property names directly beneath the object definition, indicate that those properties are associated with the object.
Notice for our button, how we can specify the OnSelect property, and how we can assign a Power Apps formula to set the variable value.
A final note is that when we build a screen with code, we need to be cautious with how we name controls. The name of every control must be unqiue throughout an app. If we fail to adhere to this naming convention, we'll receive errors when we package our app.
Defining control references
To support the controls that we use in an app, there are two relevant areas in the project that we need to examine.
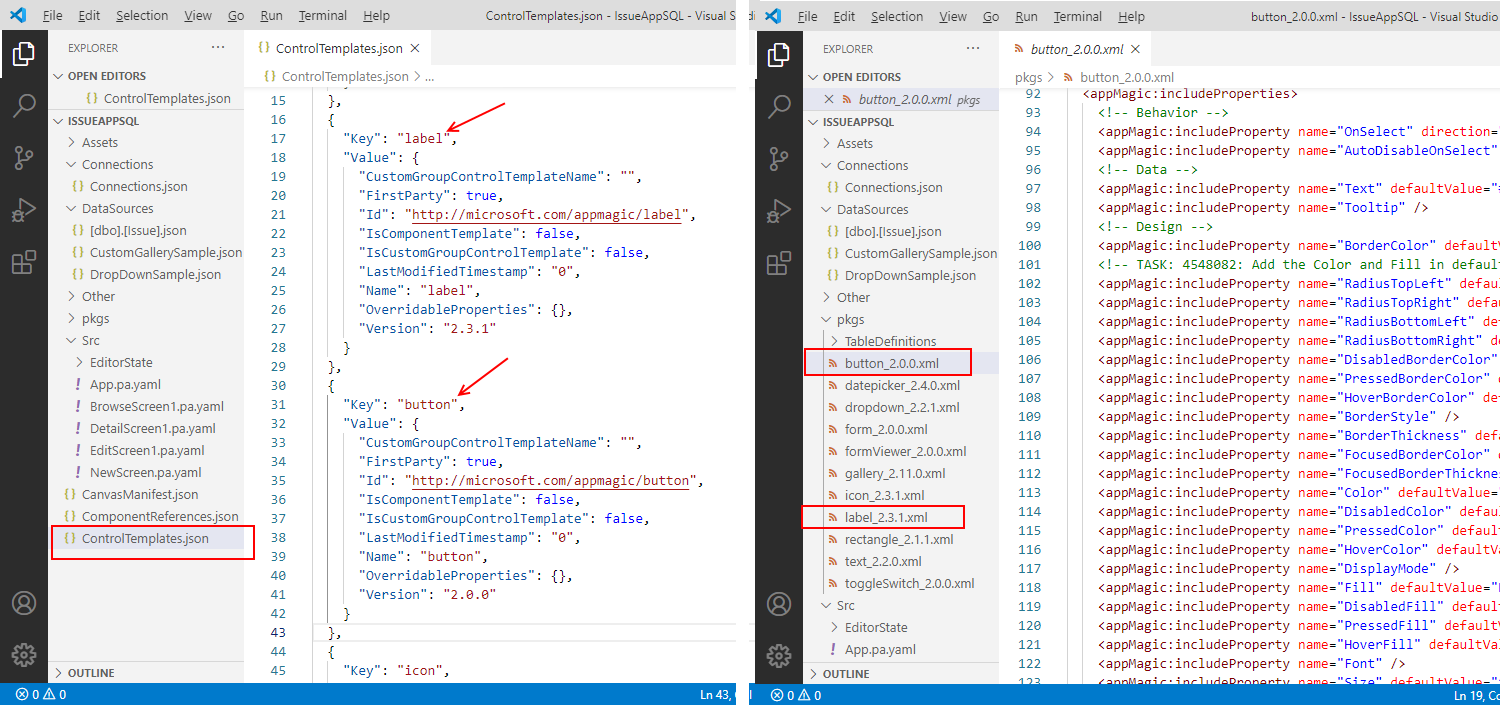
The ControlTemplates.json file contains a list of the controls in the app, including the version numbers. Because in this example we're adding a label and a button to our app, we need to ensure that the ControlTemplates.json file includes entries for these two controls.
The ControlTemplates.json file contains a list of the controls in the app, including the version numbers. Because in this example we're adding a label and a button to our app, we need to ensure that the ControlTemplates.json file includes entries for these two controls.
The pkgs folder contains xml files for each control that we specify in the ControlTemplates.json file. These xml files store the property names that relate to the controls (for example, Text, BorderColor, Font, Size, etc)
The important thing here is that the ControlTemplates.json file must contain entries for all controls that we use in an app, and there must be a corresponding xml file for each control in the pkgs folder.
Repacking our app
Once we complete the modifications for our app, we can repackage our source code into an MS app file. To do this, we open a command prompt and call PASopa with the following arguments:
pasopa -pack ToApp.msapp FromSourceFolder
The syntax to package our code project into an output file called IssueAppSQLNew.msapp looks like this:
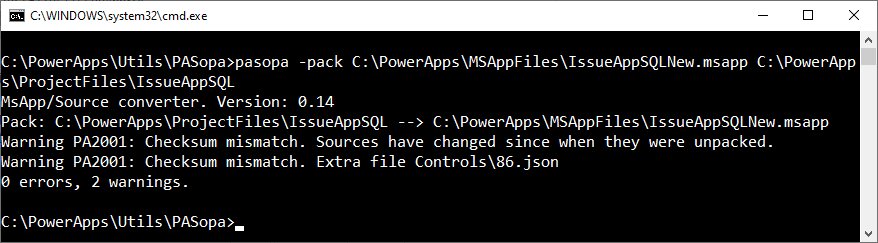
pasopa -pack C:\PowerApps\MSAppFiles\IssueAppSQLNew.msapp
       C:\PowerApps\ProjectFiles\IssueAppSQL
When we run this command, we will receive checksum mismatch messages.
I found these messages confusing at first. However, they are warnings rather than errors, and we can ignore these. When the process completes, our output msapp file will appear in our target location.
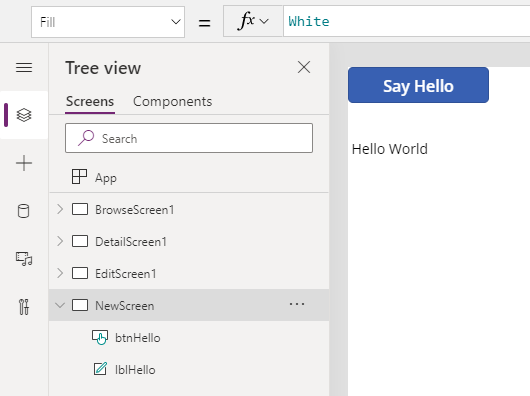
Testing our App
We can now take our msapp file and open in it in Power Apps Studio. As this screenshot shows, the new screen and the controls that we added appear in the designer. When we run our app, the button will function as intended.
Conclusion
The ability to build canvas apps from source code will revolutionise the way in which we build canvas apps.
It will help resolve many of the limitations of the current designer, such as a lack of support for source control integration, the ability to support multiple app builders, find and replace capabilites, and many more.
At the moment, this is still an experiental feature. There is not much documentation, and I found it easy to build and package apps that would not fail to load in the designer. However, this feature is a great step forward and holds great potential.
