Dataverse - How to access data more easily through TDS
A feature of Dataverse is that it supports the TDS (Tabular Data Stream) protocol. When we enable TDS support in Dataverse, we can access tables in a read-only way through supported applications, including SQL Server Management Studio and PowerBI. In this post, we'll explore this feature in more detail, including the steps to setup TDS, and the use-case scenarios.
What's the benefit of using SQL and PowerBI?
With so many ways to access data in Dataverse (for example,
through model driven apps, FetchXML queries, .NET API), what's a good use case scenario for using Management Studio and PowerBI?
The answer is that it simplifies the process of retrieving data for reporting or analytical purposes. It works particularly well when we want to perform ad hoc queries that may be unusual or difficult to carry out using some other means.
To give an example, public sector organisations in the UK have a legal
obligation to respond to freedom of information requests. These one-off
requests can often be obscure, and very statistical in nature. In this scenario, skilled users can use SQL to query Dataverse in a precise way, that could include multiple joins and complex filter conditions.
With TDS enabled, citizen developers can connect to Dataverse through PowerBI. This provides a simple and graphical way to build reports over data. There are more details in the documentation here.
How to enable TDS
To enable TDS, we visit the Power Platform admin centre.
From here, we select the environment that hosts our Dataverse database, and open the settings for the environment. In the search bar, we can search for the term 'TDS'. This reveals the 'TDS endpoint' setting, and we can select the option to enable the endpoint.

Finding the End Point address for a Dataverse database
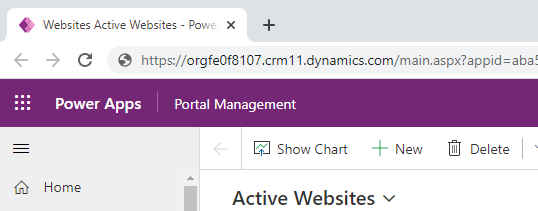
The next stage is to determine the endpoint for the database. The endpoint address is simply the organisation URL, and we can easily determine this by opening a model driven app and examining the address. In the example beneath, the address is: orgfe0f8107.crm11.dynamics.com
Connecting to Dataverse from Management Studio
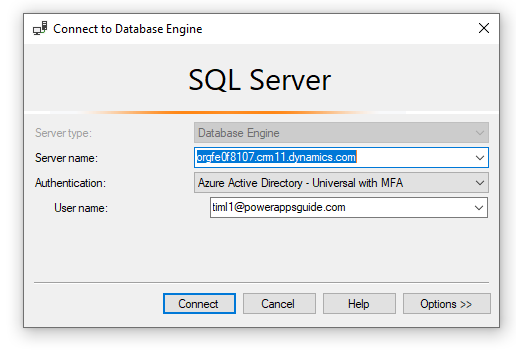
To connect to Dataverse from Management Studio (minimum version, v18.4), we enter the Dataverse end point address into server name textbox. The important thing here is to select the "Azure Active Directory" option in Authentication dropdown. This is because the TDS endpoint in Dataverse supports AAD authentication only.
When the connection succeeds, we can access the tables in our Dataverse database through Object Explorer. We can issue SQL statements to select data from our tables, which can include joins to multiple tables, 'where' clauses, and aggregate functions.

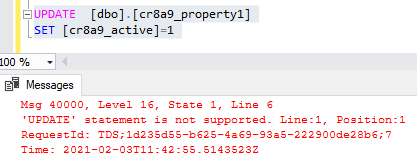
The most important thing to note is that this feature provides read-only
access to data. An error will occur if we attempt to update or to add
records.
Can we access Dataverse using other tools and apps?
Ideally, it would be great if we could connect to Dataverse using any TDS client. This would open up the possibility to backup, run reporting, and other utilities against our data.Unfortunately, the only supported apps at this time are SQL Server Management studio and PowerBI.
As an example, I attempted to connect to Dataverse through Microsoft Access. This is the error that I received. Here, the ODBC client attempts to retrieve server metadata by calling the SQL function DATABASEPROPTERTYEX. The Dataverse endpoint does not support this, which results in the error that we see.

Conclusion
Enabling TDS opens read-only access to tables through SQL Management Studio and PowerBI. This canhelp especially when we want to carry out reporting tasks. In this post, we looked at how to enable this feature in Dataverse, and how to make a connection from SQL Server Management Studio.
