Connectors - How to use the Microsoft Teams connector to add messages/meeting invites to Teams
By using the Microsoft Teams connector, we can add valuable functionality to our apps. This post introduces Teams and the Teams Connector, and provides an overview of the formula to carry out the most common tasks.
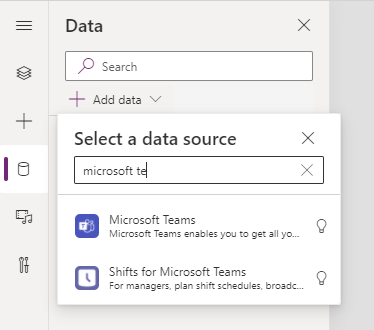
To get started, the first step is to add the Microsoft Teams connector to an app,
To get started, the first step is to add the Microsoft Teams connector to an app,
This connector provides a wide range of features including:
- Creating teams and channels, and adding members to a team
- Retrieving teams and channels
- Posting and replying to messages
- Setting up meeting invites
- Methods to post adaptive cards
Microsoft Teams - A quick introduction
Although most people are familiar with Microsoft Teams, here's a very brief summary of the main parts that make up the Teams interface.
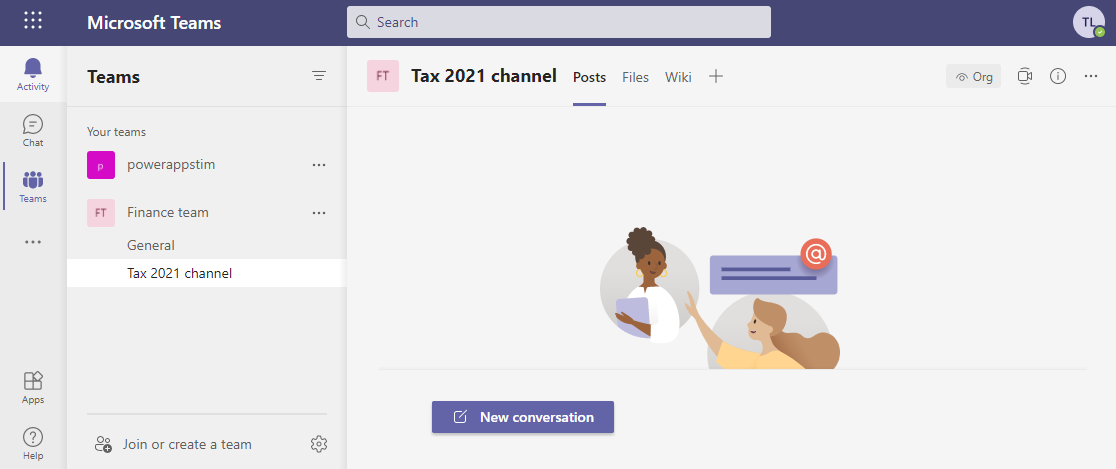
The left-hand panel shows a list of available Teams. Typically, a team corresponds to a team of employees or people that work together. A user can belong to many teams, and a user can create or join a team by using the button at the bottom of the Teams panel.
Each team can contain multiple channels. Typically, a channel corresponds to a particular project that a team works on. In the screenshot above, there is a team called "Finance team", and there are two channels - the default "General" channel (which exists for all teams), and a channel called "Tax 2021 channel".
Each team can contain multiple channels. Typically, a channel corresponds to a particular project that a team works on. In the screenshot above, there is a team called "Finance team", and there are two channels - the default "General" channel (which exists for all teams), and a channel called "Tax 2021 channel".
Within each channel, there are a series of tabs. The three default tabs include posts, files, and wiki. The posts tab provides a place where users can post messages/conversations.
Displaying a list of Teams
To display a list of teams that are available to the current user, we call the GetAllTeams method.
MicrosoftTeams.GetAllTeams().value
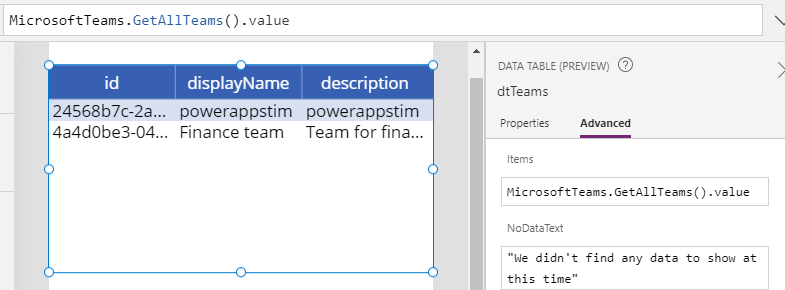
This method returns a table called 'value' that includes the following three columns:
- id - this is a unique GUID that identifies a team. This value is important because we use this to retrieve the channels that are related to a team.
- displayName - this is the short display name for the team.
- description - this is the longer description that describes a team.
Displaying/Retrieving Channels
To display a list of channels that are associated with a team, we call the GetChannelsForGroup method. This method requires us to pass the ID of the team.
MicrosoftTeams.GetChannelsForGroup("4a4d0be3-0456-4ceb-b84c-2acf52572ea1").value
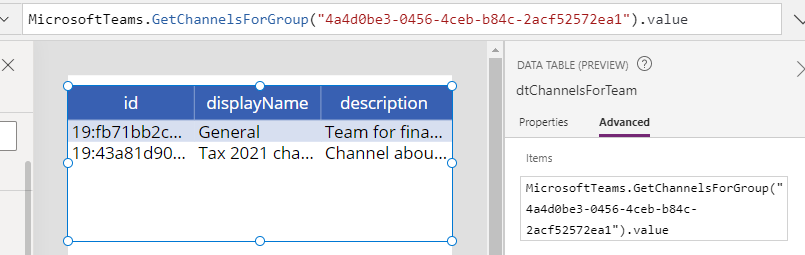
This method returns a table called 'value' that includes the following three columns:
- id
- this is a unique GUID that identifies a channel. This value is important
because we need this to add messages to a channel.
- displayName - this is the short display name for the channel.
- description - this is the longer description that describes a channel.
If we want to retrieve a list of channels by team name, rather than team ID, we can incorporate the use of the LookUp function like so:
MicrosoftTeams.GetChannelsForGroup(
       LookUp(MicrosoftTeams.GetAllTeams().value,
             displayName="Finance team"
       )
).value
Creating a Team and Channels
MicrosoftTeams.CreateATeam("Sales team",
                           "Team for sales department"
)
Creating a Channel
To create a channel, we call the CreateChannel method. This requires us to
pass three arguments - the team id, the display name of the new channel that we want to add, and the description of the new channel.
Here's the formula to add a new channel called "Social media strategy" to our "Sales team" team. This formula looks up the team ID by name, but we can pass the ID instead if this is known.
With({selectedTeam: LookUp(MicrosoftTeams.GetAllTeams().value,
                           displayName="Sales team")
     },
     MicrosoftTeams.CreateChannel(selectedTeam.id,
                                  "Social media strategy",
                                  {description:"Channel about social media"}
     )
)
The notable thing about this formula is that we must pass the channel description as a record. This is the reason why the description "Channel about social media" is wrapped in curly brackets.
Posting/Adding a channel message
To add a message to a channel, we call the PostMessageToChannelV3 method. This
requires us to
pass three arguments - the team id, the channel id, and the message that we want to post..
Here's the formula to post a new message to our "Social media
strategy" channel.
Set(varSalesTeam,
    LookUp(MicrosoftTeams.GetAllTeams().value,
           displayName="Sales team"
    )
);
Set(varSocialChannel,
    LookUp(MicrosoftTeams.GetChannelsForGroup(varSalesTeam.id).value,
           displayName="Social media channel"
    )
);
MicrosoftTeams.PostMessageToChannelV3(varSalesTeam.id,
                                      varTaxChannel.id,
                                      {content:"<b>HTML snippet</b>HTML message",
                                       contentType:"html"}
)
This looks up the team and
channel details, and stores the result in variables. We refer to these variables in the call
to PostMessageToChannelV3 method.
The message body that pass to PostMessageToChannelV3 is a record. This record must contain two attributes: 'content' and 'contentType'. The acceptable values for 'contentType' are 'text' and 'html'. If we provide the content type 'html', we can use the 'content' attribute to specify richly formatted HTML content.
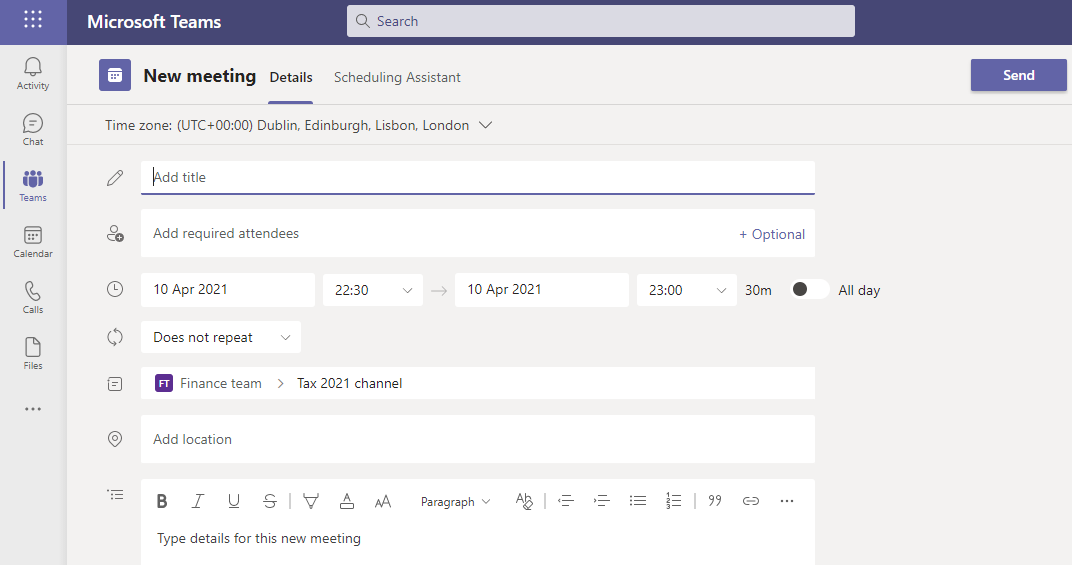
Creating a Teams Meeting
To create a teams meeting, we call the CreateTeamsMeeting method. As a point of reference, the screenshot beneath shows the screen in Microsoft Teams that creates a meeting. This highlights the values that we can set when we create a meeting.
Because we create meetings in calendars, the CreateTeamsMeeting method requires us to pass the ID of a calendar.
We can retrieve a list of available calendars for a user by adding the Office365Outlook connector, and calling the CalendarGetTables method.
We can retrieve a list of available calendars for a user by adding the Office365Outlook connector, and calling the CalendarGetTables method.
Here's the formula to retrieve a list of available calendars into a variable called varCalendars. If we examine this variable in the designer, we see that the return table includes a column called 'Name'. This is the unique identifier for a calendar.
Set(varCalendars,
    Office365Outlook.CalendarGetTables().value
)
In the screenshot below, there are three available calendars - Birthdays, Calendar, and United Kingdom holidays.

Once we obtain the 'Name' of a target calendar, we can use the following formula to create a new teams meeting.
MicrosoftTeams.CreateTeamsMeeting(
        LookUp(varCalendars,DisplayName="Calendar").Name,
        "Meeting subject text",
        {content:"Meeting body text", contentType:"text"},
        "GMT",
        {dateTime:"2021-04-11T18:30:00"},
        {dateTime:"2021-04-11T19:30:00"},
        true,
        "teamsForBusiness",
        {requiredAttendees:"[email protected]"}
)
- Calendar Id
- this defines the calendar ID where we want to add a meeting request. The formula here looks up the name in varCalendars that corresponds to the calendar called "Calendar".
- Meeting subject - this defines the subject text that appears in the calendar entry.
- Meeting body - this defines the content of the calendar entry body. We pass a record with two attributes - 'content' and 'contentType'. The permissible 'contentType' values are 'text' and 'html'.
- Timezone - this defines the timezone ("GMT" in this example).
- Start datetime - this defines the start date and time. We pass a record with an attribute "dateTime", and a datetime value in a format that looks like this "2021-04-11T18:30:00".
- End datetime - this defines the end date and time.
- Is online meeting - this specifies that the calendar entry refers to an online meeting, and we set this to true.
- Meeting provider - this specifies that the calendar entry refers to a "Micorost Teams meeting", and we set this to "teamsForBusiness".
- Other attributes - the final parameter enables us to pass a record that specifies a range of other attributes, including the attendee email addresses, optional attendees, recurrence settings, and location settings. The IntelliSense in the designer shows the required field names.
