Portal Apps - How to edit the source of a Portal App with Visual Studio Code - a quick guide
In common with all products in the Power Platform, we build portal apps using an online designer. Whilst this provides an easy way to work, particularly for no-code app builders, it can be restrictive for more complex apps and for more experienced app builders.
The great news is that it's now possible to download the source code for a portal app and to modify the HTML, JavaScript, and the Liquid code code using an IDE, such as Visual Studio Code. This offers a wide range of benefits, including:
The great news is that it's now possible to download the source code for a portal app and to modify the HTML, JavaScript, and the Liquid code code using an IDE, such as Visual Studio Code. This offers a wide range of benefits, including:
- The ability to work more productively through a rich IDE, and to take advantage of valuable features such as "find and replace", and Visual Studio Code extensions.
- The ability to add changes to source control
- Better support for multiple app builders working on the same app
- The ability to work offline
An overview of how to edit a portal app in Visual Studio Code
The high level overview of how to edit a portal app through source code is as follows:- Install the CLI (command line interface)
- Download the source code for the portal app
- Make the modifications locally using Visual Studio Code
- Apply the modifications by uploading the source code
Step 1 - Install the CLI
The first step is to download and install the CLI from the link beneath.
https://aka.ms/PowerAppsCLIThe pre-requistes for installing the CLI include the NPM (Node package manager), and the .NET Framework 4.6.2 Developer Pack. There full instructions are here.
https://docs.microsoft.com/en-gb/powerapps/developer/data-platform/powerapps-cli#install-power-apps-cli
https://docs.microsoft.com/en-gb/powerapps/developer/data-platform/powerapps-cli#install-power-apps-cli
It's very possible that you may have already installed the CLI in order to build PCF components. If this is the case, the following command line updates/installs the portal components.
pac install latest
Step 2 - Download the portal source code
The second step is to download the source code for the portal app.
We authenticate to our instance of Dataverse by running the following command (we substitute the URL with the URL of our tenant).
pac auth create --url https://orgfe0f8106.crm11.dynamics.com
Next, we run the following command to retrieve the 'web site ID' of the portal app that we want to edit. This will be a unqiue GUID.
Step 3 - Make the modifications in Visual Studio Code
pac paportal listWe then run the following command to download the source code for our portal into a local folder.
pac paportal download --path "C:\portals"
                      --webSiteId f88b70cc-580b-4f1a-87c3-41debefeb902
Step 3 - Make the modifications in Visual Studio Code
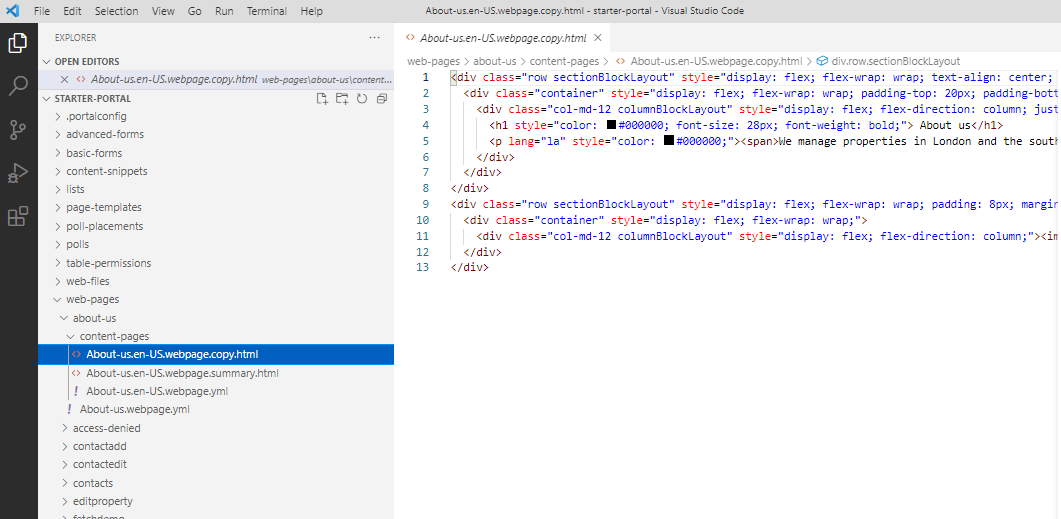
We can now open our source code in Visual Studio Code and make our modifications. As the screenshot beneath illustrates, the download process creates a folder structure, and we can locate the HTML and content that we want to edit.

The recommended code editor is Visual Studio Code, because this offers the 'Power Platform VS Code Extension' which provides additional productivity benefits. This includes IntelliSense and code completion for liquid code, editor icons that correspond to the objects in the portal app, the ability to preview our work directly in the editor.

There are more details about the 'Power Platform VS Code Extension' here.
Step 4 - Upload the changes
Once we we complete our changes, we run the following command to upload and to apply our changes.
pac paportal upload --path "C:\portals"
Conclusion
This post gave an overview of how to download the source code for a Portal App, and to edit the content in Visual Studio Code. This great new feature offers a wide range of benefits including the ability to use value added features that are in Visual Studio Code, the ability to check changes into source code, improved support for multiple developers, and the ability to work offline.
