Walkthrough - How to support multiple languages on model driven app pages
With the release of the page localisation preview, we can now build model driven app pages that support multiple languages. Power Apps can display the same page in different languages depending on the language setting of the user.
To build a page that supports multiple languages, we define key/value pairs of translated text in resource files. We then use Power FX formula to retrieve the localized content from the resource files.
The official Microsoft site provides a detailed guide on how this feature works.
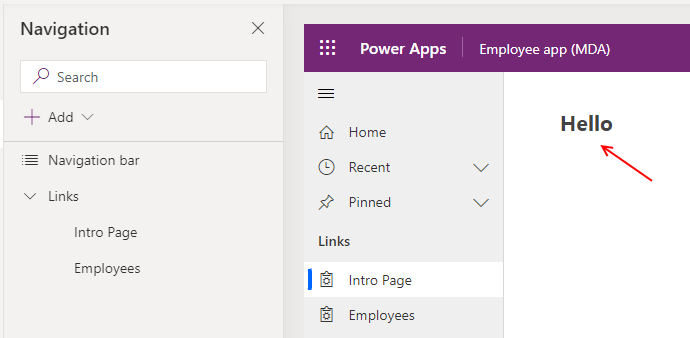
This post summarises the main points and walks through a simple example of how to localise a label on a page. The page contains a label that says "hello". The aim of this exercise is to customise the label text to display in either English or Spanish, depending on the user language setting.
Pre-requisite steps
A prerequisite step is to enable the languages that we want to support at an environment level. We do this through the Power Platform Admin Centre.For this example, the next step is to create a model driven app and to add a page.
Creating the resource files
To create a localized app, we store the localized content in XML resource files (ie, resx files). This technique is identical to the method that developers use to localize ASP.NET pages.
For this example, I used Visual Studio to create and edit the resx files. If you don't have or don't want to install Visual Studio, you can manually create the XML resource files in a text editor of your choice. I've attached a template resx file at the end of this post for this purpose.
A resx file contains key value pairs. The screenshot below illustrates the English resource file. The name column uniquely identifies the value to localize, and the value column contains the localised text for the target language.
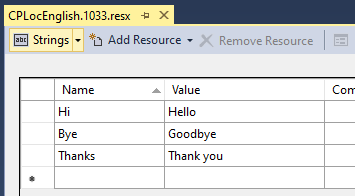
We save the resx file for the base language (English in this example) to our local computer.
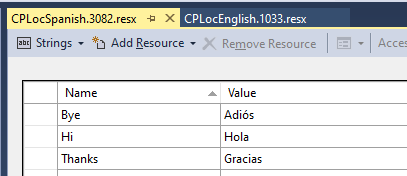
Next, we create separate resx files for each language that we want to support. The screenshot below illustrates the Spanish resx file. Notice how the value column contains the Spanish translations.
Uploading the resource files into our environment
Once we create the resource files, the next step is to make those files available by uploading them into the target environment as "web resources". We then add a resource that points to the web resource from our canvas page. Both of these tasks can be carried out through the resources panel of the page editor.
We first create a web resource for the English resx file, as shown beneath. The "Display name" defines the identifier we use to access the localized content through the canvas app designer. The official documentation uses name "CPLoc" (an acronym of - canvas page
localization) and I've retained the same convention for this example.
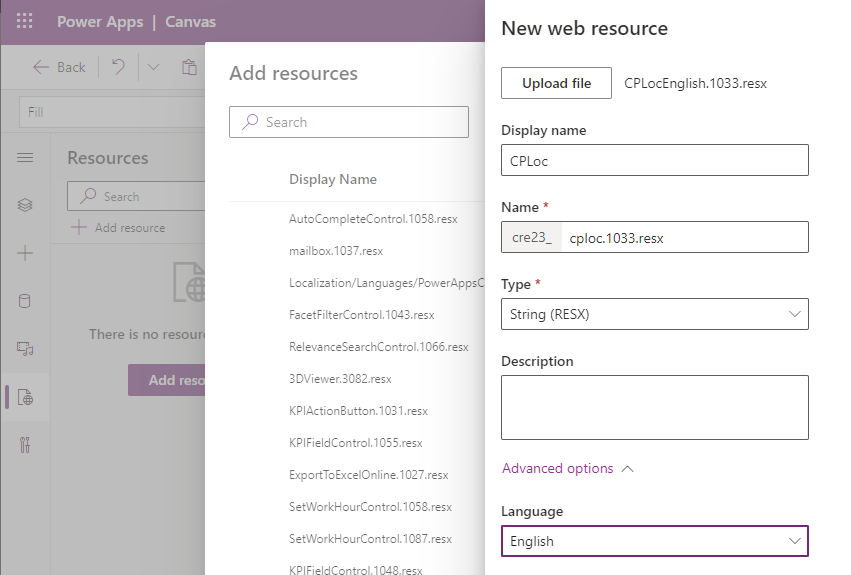
The "Name" setting is very important, and must be in the format <filename>.<codepage>.resx. The app will not show localized content correctly if we get the naming convention wrong. <filename> can be anything we choose, but it must remain consistent for any subsequent "web resources" that we add for different languages.
<codepage> is a number that identifies the language of the resx file. 1033 is the ID for English, and 3082 is the ID for Spanish. Here's a list of supported language IDs:
<codepage> is a number that identifies the language of the resx file. 1033 is the ID for English, and 3082 is the ID for Spanish. Here's a list of supported language IDs:
Once we add the English web resource, the next step is to add the Spanish web resource. For the Spanish version, the "Display name" must be the same as the English version (CPLoc in this example).

We set the name to "cploc.3082.resx". The important point is that the "cploc" suffix must match the English name setting, and we must specify 3082 language ID in the name.
Once we create web resources for both the English and Spanish resx files, we can add the English version of the CPLoc web resource to the canvas page. It's only necessary to add the resource for the base language so in this example, there's no to add both the Spanish and English resources to the page.
Localizing the content on the canvas page
Once we add to resource to our canvas page, we can reference CPLoc in
formula. To configure a label to show the localised version of "Hello", we set the text property to "CPLoc.Hi"
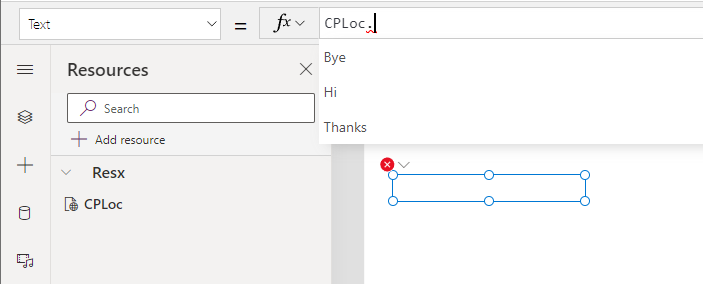
Notice how the IntelliSense in the designer shows all the localised key values that are accessible through CPLoc.
With the label text now sit to "CPLoc.Hi", we can see how the designer shows the localised text in the authoring language (ie, Hello).

This completes the exercise and we can now check that the page works as expected, after publishing both the page and the model driven app.
Checking that the target page displays correctly in Spanish
To check that the page works correctly in Spanish, we set the user interface language to Spanish through the "Personalization settings" option that we access through the settings/cog icon.
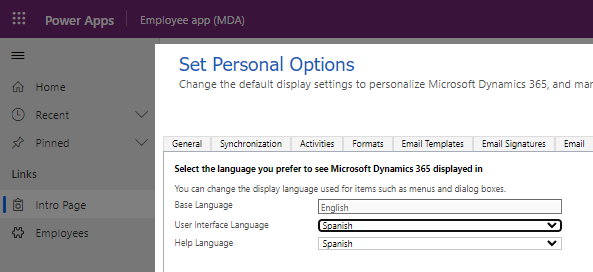
When we play our app, the text on the label will appear in Spanish as expected.

Conclusion
Following the release of the page localisation preview, it's now possible to configure model driven app pages to support multiple languages based on resource files. This post walked through a simple example of how to localise a page to work in both English and Spanish.
======================================================
======================================================
For reference, here's a template resx file. Because I created this in Visual Studio, it contains extraneous content such as commented help and metadata. However, it's a complete working file and the pertinent name/value pairs appear towards the end of the file.
<?xml version="1.0" encoding="utf-8"?>
<root>
  <!--
    Microsoft ResX Schema

    Version 2.0

    The primary goals of this format is to allow a simple XML format
    that is mostly human readable. The generation and parsing of the
    various data types are done through the TypeConverter classes
    associated with the data types.

    Example:
    ... ado.net/XML headers & schema ...
    <resheader name="resmimetype">text/microsoft-resx</resheader>
    <resheader name="version">2.0</resheader>
    <resheader name="reader">System.Resources.ResXResourceReader,
        System.Windows.Forms, ...</resheader>
    <resheader name="writer">System.Resources.ResXResourceWriter,
        System.Windows.Forms, ...</resheader>
    <data name="Name1"><value>this is my long string</value>
        <comment>this is a comment</comment></data>
    <data name="Color1" type="System.Drawing.Color, System.Drawing">Blue</data>
    <data name="Bitmap1" mimetype="application/x-microsoft.net.object.binary.base64">
        <value>[base64 mime encoded serialized .NET Framework object]</value>
    </data>
    <data name="Icon1" type="System.Drawing.Icon, System.Drawing"
        mimetype="application/x-microsoft.net.object.bytearray.base64">
        <value>[base64 mime encoded string representing a byte array form
         of the .NET Framework object]</value>
        <comment>This is a comment</comment>
    </data>

    There are any number of "resheader" rows that contain simple
    name/value pairs.

    Each data row contains a name, and value. The row also contains a
    type or mimetype. Type corresponds to a .NET class that support
    text/value conversion through the TypeConverter architecture.
    Classes that don't support this are serialized and stored with the
    mimetype set.

    The mimetype is used for serialized objects, and tells the
    ResXResourceReader how to depersist the object. This is currently not
    extensible. For a given mimetype the value must be set accordingly:

    Note - application/x-microsoft.net.object.binary.base64 is the format
    that the ResXResourceWriter will generate, however the reader can
    read any of the formats listed below.

    mimetype: application/x-microsoft.net.object.binary.base64
    value   : The object must be serialized with
            : System.Runtime.Serialization.Formatters.Binary.BinaryFormatter
            : and then encoded with base64 encoding.

    mimetype: application/x-microsoft.net.object.soap.base64
    value   : The object must be serialized with
            : System.Runtime.Serialization.Formatters.Soap.SoapFormatter
            : and then encoded with base64 encoding.

    mimetype: application/x-microsoft.net.object.bytearray.base64
    value   : The object must be serialized into a byte array
            : using a System.ComponentModel.TypeConverter
            : and then encoded with base64 encoding.
    -->
  <xsd:schema id="root" xmlns="" xmlns:xsd="http://www.w3.org/2001/XMLSchema"
    xmlns:msdata="urn:schemas-microsoft-com:xml-msdata">
    <xsd:import namespace="http://www.w3.org/XML/1998/namespace" />
    <xsd:element name="root" msdata:IsDataSet="true">
      <xsd:complexType>
        <xsd:choice maxOccurs="unbounded">
          <xsd:element name="metadata">
            <xsd:complexType>
              <xsd:sequence>
                <xsd:element name="value" type="xsd:string" minOccurs="0" />
              </xsd:sequence>
              <xsd:attribute name="name" use="required" type="xsd:string" />
              <xsd:attribute name="type" type="xsd:string" />
              <xsd:attribute name="mimetype" type="xsd:string" />
              <xsd:attribute ref="xml:space" />
            </xsd:complexType>
          </xsd:element>
          <xsd:element name="assembly">
            <xsd:complexType>
              <xsd:attribute name="alias" type="xsd:string" />
              <xsd:attribute name="name" type="xsd:string" />
            </xsd:complexType>
          </xsd:element>
          <xsd:element name="data">
            <xsd:complexType>
              <xsd:sequence>
                <xsd:element name="value"
                   type="xsd:string" minOccurs="0" msdata:Ordinal="1" />
                <xsd:element name="comment"
                    type="xsd:string" minOccurs="0" msdata:Ordinal="2" />
              </xsd:sequence>
              <xsd:attribute name="name" type="xsd:string"
                    use="required" msdata:Ordinal="1" />
              <xsd:attribute name="type" type="xsd:string" msdata:Ordinal="3" />
              <xsd:attribute name="mimetype" type="xsd:string" msdata:Ordinal="4" />
              <xsd:attribute ref="xml:space" />
            </xsd:complexType>
          </xsd:element>
          <xsd:element name="resheader">
            <xsd:complexType>
              <xsd:sequence>
                <xsd:element name="value"
                    type="xsd:string" minOccurs="0" msdata:Ordinal="1" />
              </xsd:sequence>
              <xsd:attribute name="name" type="xsd:string" use="required" />
            </xsd:complexType>
          </xsd:element>
        </xsd:choice>
      </xsd:complexType>
    </xsd:element>
  </xsd:schema>
  <resheader name="resmimetype">
    <value>text/microsoft-resx</value>
  </resheader>
  <resheader name="version">
    <value>2.0</value>
  </resheader>
  <resheader name="reader">
    <value>System.Resources.ResXResourceReader,
           System.Windows.Forms, Version=4.0.0.0, Culture=neutral, PublicKeyToken=b77a5c561934e089</value>
  </resheader>
  <resheader name="writer">
    <value>System.Resources.ResXResourceWriter,
            System.Windows.Forms, Version=4.0.0.0, Culture=neutral, PublicKeyToken=b77a5c561934e089</value>
  </resheader>
  <data name="Bye" xml:space="preserve">
    <value>Goodbye</value>
  </data>
  <data name="Hi" xml:space="preserve">
    <value>Hello</value>
  </data>
  <data name="Thanks" xml:space="preserve">
    <value>Thank you</value>
  </data>
</root>
