Canvas Apps - The easiest way to show Confirmation Dialogs

For around the past 9 years, showing confirmation dialogs in canvas apps has been difficult. This is a common feature requirement, particularly when adding buttons to delete records.

The typical workaround involves building a custom dialog that's hidden and shown through the use of variables when the user triggers an action that requires confirmation. 

The great news is that Power FX has introduced a new Confirm function, which is available in both canvas and model driven apps. 

Here's a walkthrough on how to use this function.

How to Show a Confirmation Dialog - Walkthrough

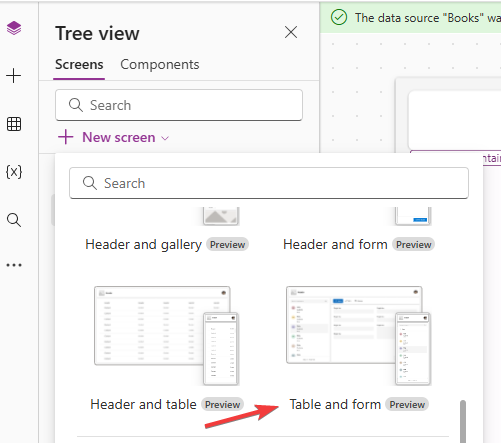
To demonstrate how this new feature works, here's a screen that I created in a canvas app with the 'Table and form' template. 


After creating this screen, I set the data source of the table and form controls to a Dataverse table called 'Books'.

This screen template already includes a delete button, as shown in the screenshot beneath.


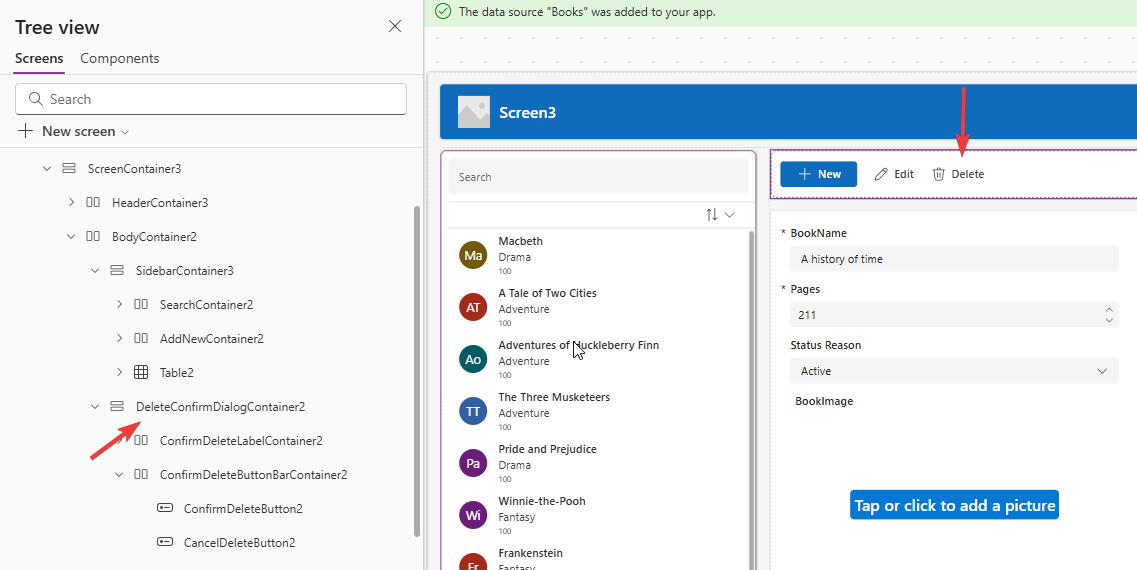
Notice how this screen template includes DeleteConfirmDialogContainer. Prior to the new Confirm dialog, the content here is what would need to be created we wanted to display a confirmation dialog using the traditional method.    

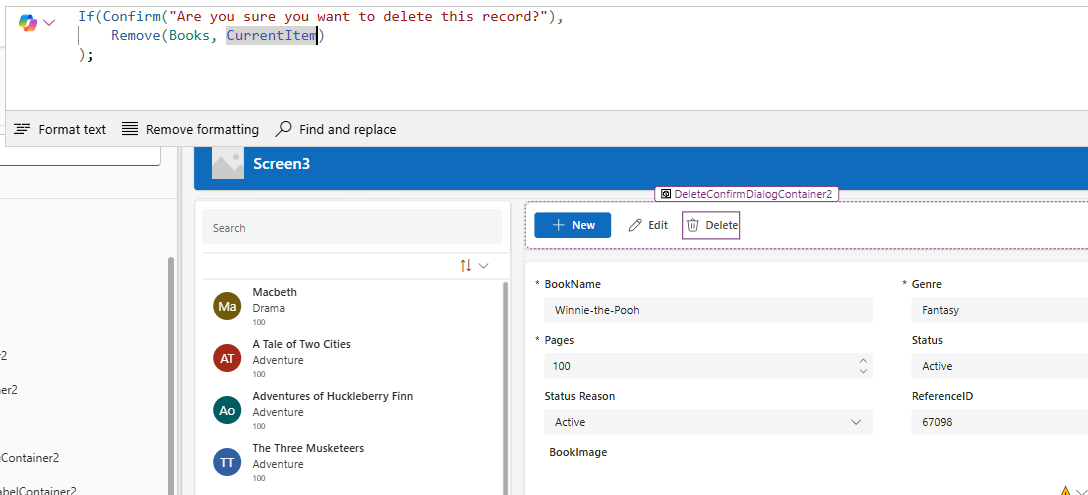
To use the new confirmation dialog, we can set the OnSelect property of the delete button using this syntax.

If(Confirm("Are you sure you want to delete this record?"),
Remove(Books, CurrentItem)
);


To explain this syntax, the Confirm function returns true if the user clicks 'confirm', and false if the user clicks 'cancel'. By wrapping the call in an If statement, we can specify the formula that runs when the user clicks 'confirm'.

To test this, we can now run the screen and click the delete button. The confirmation dialog will appear, as shown below.


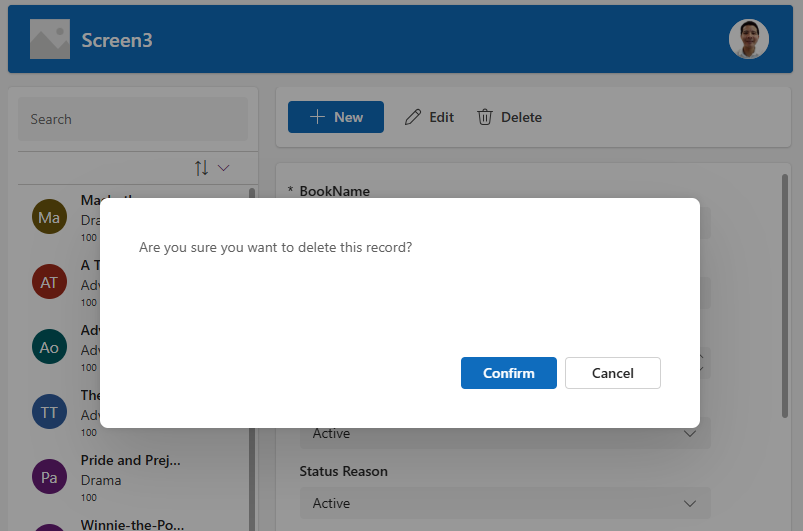
Clicking the Confirm button will now call the Remove function to delete the record.

How to Customise the Confirmation Dialog

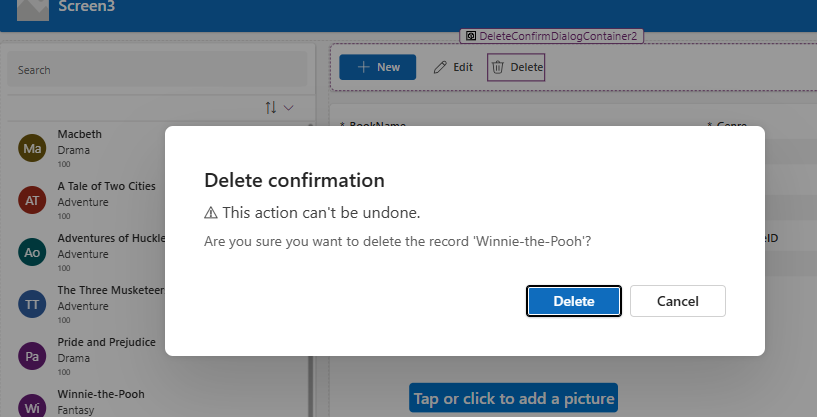
To customise the appearance of the dialog, we can pass a record to the Confirm function. This enables us to set a title, subtitle, and the text that appears on the buttons. The syntax to set these values look like this:

If(Confirm("Are you sure you want to delete the record '" & CurrentItem.BookName & "'?",
{
Title: "⚠ Delete confirmation",
Subtitle: "This action can't be undone.",
ConfirmButton: "Delete",
CancelButton: "Cancel"
}),
Remove(Books, selectedRecord)
);

The colour of the 'confirm' and 'cancel' buttons will inherit the theme colour of the app, so the only way to change those would be to change the theme. 

Here's a screenshot of how these elements look at runtime. 

In the screenshot above, note how we can insert emoji symbols like ⚠ into the dialog. In Windows, we can use the 
Windows . shortcut key to insert emojis.

Are there any limitations?

The main limitation of the Confirm function is that it isn't possible to add additional buttons, or to show only a single button.

The ability to show only a single button would enable us to display a model message box with an 'OK' button (eg, a message box with 'This record has been deleted'). Hopefully this feature might be added at a future time, as it would provide more visible alerts, compared to the banner messages that the 'Notify' function provides.

Conclusion

Up till now, displaying a model confirmation dialog involved much work. The Confirm function is a very welcome addition that makes this task much simpler.
.
 

Related posts

FormuIas - Is it possible to call a user-defined function recursively in Power Apps?
January 31, 2024
Formulas - A beginners guide on how to create and call user-defined functions (UDFs)
January 28, 2024
Formula - How to add a button that converts degrees Centigrade to Fahrenheit and vice versa
May 08, 2023
Formula - How to convert a single delimited string to rows and columns
April 05, 2023
Data - How to group data in a gallery and calculate sums
January 20, 2023
Formula - How to calculate compound interest
November 24, 2022
Utilities - The best way to peform OCR on images of Power Apps Formulas
October 11, 2022
Example - How to use a drop down control to convert currencies
September 27, 2022
Formula - How to parse JSON in Power Apps- 4 examples
September 15, 2022
Data - How to get a row by ordinal number
April 28, 2022
Formula - What to do when the If statement doesn't work?
December 17, 2021
Formula - Boolean And / Or operators - What is the order of precedence?
December 16, 2021
Controls - How to set the data source of a Combo Box to a comma separated string
November 16, 2021
Numbers - 10 examples of how to round numbers
August 18, 2021
Formula - Difference between round, square, and curly brackets
July 20, 2021
Top 3 highlights of upcoming enhancements to the Power Apps language (Power FX)
May 26, 2021
Email - Sending email attachments with the Office 365 Outlook connector
March 30, 2021
Formula - What to try when numbers don't format correctly
March 24, 2021
Controls - How to convert HTML to Text
March 23, 2021
Formulas - how to return all days between two dates
March 15, 2021
Formula - How to create comma separated (CSV) list of items
February 25, 2021
Formula - How to use the IF and Switch functions - 3 common examples
February 12, 2021
Location - Finding the closest location and and sorting records by distance, based on the current location of the user
January 24, 2021
Formulas - How to cope with weekends and public holidays in date calculations
January 21, 2021